|
Attaching Ordnance
by David
W. Aungst

HyperScale is proudly supported by Squadron
I like to build a certain amount of "survivability" into
my models.
I realized a long time ago that the models I build are
likely to be sitting on my display shelves for quite a few years. I will
regularly dust them. My kids will occasionally launch flying objects into
them. And, I will have to move them about from time to time. Building the
models so that these routine happenings do not cause damage keeps me
happier - I hate having to take time from the "current" model to fix a
broken model.
One of the more fragile components of most any aircraft is its weapons and
other ordnance. Bombs, fuel tanks, gun pods, rocket pods -- all are
usually only attached to the model at two tiny contact points. As they
normally get attached fully painted, the only glue that makes sense to use
on them is super glue. But, super glue is itself rather brittle and prone
to break easily under almost any shearing force. After getting tired of
continually re-attaching weapons to my models, I decided to find a better
way to do the attachments.
 Building
some durable strength into the attachment points was what I needed. The
best answer I came up with was brass wire. Building
some durable strength into the attachment points was what I needed. The
best answer I came up with was brass wire.
A visit to a local hobby shop that deals mostly in train supplies revealed
some fine brass wire used for detailing model locomotives. The wire comes
in sizes all the way down to 0.005". That is practically as thin as a
human hair. In practise, I find that 0.010" brass is fine enough, but the
smaller size has uses.
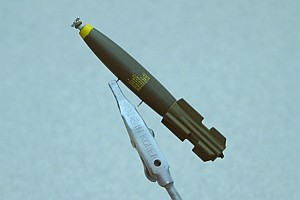
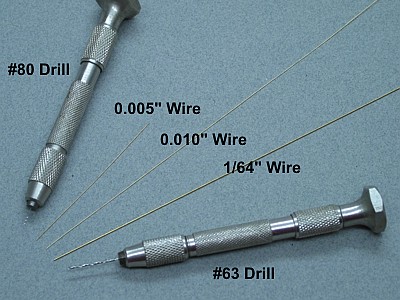
The picture to the right shows the tools and supplies needed for this
process. The two smallest wires are the train detailing supplies I wrote
about above. The larger wire is the smallest K&B brass wire, 1/64th inch.
The two needle vices show #80 and #63 drill bits, which pretty well match
the sizes of the brass wire.
-
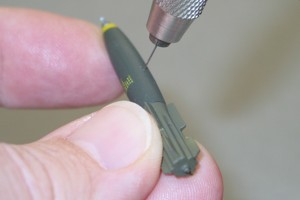
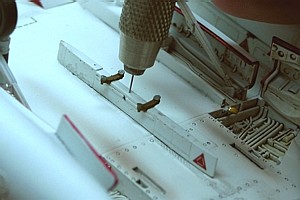
I start the process by drilling holes in the weapons where
the attachment point are found. My example shows me drilling a painted
bomb, but in practise, I drill the weapons prior to painting. The wires
then become great hand-holds for holding the weapons while painting,
decaling, and weathering.
-
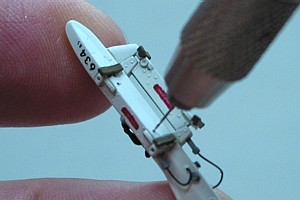
Once drilled, I insert a length of brass wire. I usually
use 0.010" diameter wire unless the weapon is very small, in which I will
use 0.005" diameter wire. Larger items like fuel tanks will get the 1/64th
inch size of wire. The limiting factor on choosing the diameter of wire is
the size of the mounting points. Very thin items will dictate the use of
finer wire. With all the weapons having the pins installed, I go on to
finish the painting, decaling, and weathering of the weapons.
-
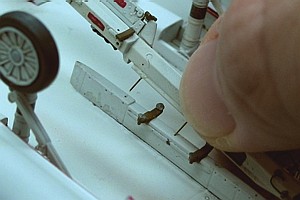
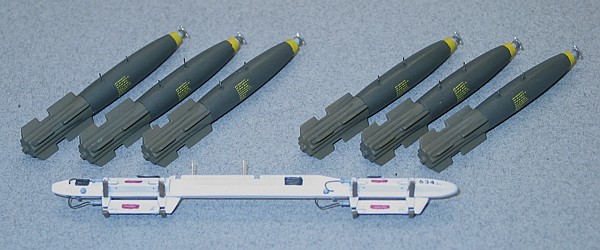
Eventually the time to attach the weapons to the model
comes along. In my example, I attaching Mk82 Snakeye bombs on a Multiple
Ejector Rack (MER), then attaching the MER to the centerline pylon of an
A-4 Skyhawk. I hold the weapon in place and note the place where the wires
are contact with the mounting points. Then, I drill the first mounting
hole. Placing the corresponding wire of the weapon into the first mounting
hole, I pivot the weapon slightly so as to scratch the paint and mark the
location of the second hole. Then I drill the second hole.
Alignment of these holes is critical. If they are not spaced properly, the
wires mounted in the weapon will not fit into both holes. Also, if they
are not aligned with the centerline of the weapon, it will hang crooked on
the model. It takes some practise and a little "eyeballing" to get the
alignments to work.
-
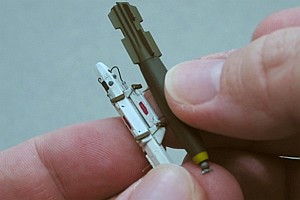
With the holes drilled, I place a small drop of super glue
on the ends of the mounting wires and slip the weapon into place. It is
actually the wires that hold the weapon. The super glue only adds
stability to the fit. Now, if I bump the weapon, it might bend over, but
it will not break off. Then, I can just bend it back and have nothing to
fix!

A side benefit of this procedure is the near elimination of glue marks on
the weapons. Since the only glue used amounts to small beads placed on the
tips of the mounting wires that get shoved into locator holes on the
model, there is almost no visible glue on the weapons after attaching
them.
I have shown this process using aircraft weapons, but the
same procedure works on most any small item on any type of model. I do
this parts pinning on antennas, dump masts, canopies, and any other
attached protrusions to the model. As the wire is much stronger than the
plastic locator pins on weapons pylons, I sometimes will even cut away the
molded pins and drill mounting points to use brass pins on these, too.
The bottom line still comes down to "survivability". Being a little
ham-handed with the model may produce a bent over weapon or antenna, but
not a broken (and potentially lost) one.
Text & Images Copyright ©
2002 by David W. Aungst
Page Created 28 January, 2002
Last Updated
19 April, 2004
Back to Reference Library
|
 Home |
What's New |
Features |
Gallery |
Reviews |
Reference |
Forum |
Search
Home |
What's New |
Features |
Gallery |
Reviews |
Reference |
Forum |
Search