Home |
What's New |
Features |
Gallery |
Reviews |
Reference |
Forum |
Search
Home |
What's New |
Features |
Gallery |
Reviews |
Reference |
Forum |
Search
|
|
Creating Custom Decals by David W. Aungst
Custom decals add a bit of uniqueness to my modeling. They make it so that I can display a model and know that few (if any) other models exist of the same subject in the same markings. I like that. They also add almost unlimited latitude to my modeling as I am no longer confined to using whatever markings the decal manufacturing community has decided to produce. Ever since my A-4E Skyhawk was posted earlier this year using my own custom decal markings, I have gotten quite a few e-mailed questions regarding the creation of the custom decals that I applied to the model. I decided the best way to fully answer these questions was to create a posting on the subject. There have been other postings and articles written on this topic. FSM wrote an article (in the Nov-99 issue) on using the ALPS printer to create custom color decals. Most articles and postings that I have read, including the FSM article, left me wanting more. I'm hoping I can fill in some of the holes for anyone else with the same feelings. At the end of this posting is a section discussing specific considerations of the mechanics to using the ALPS printer to create full-color decals. This is the subject where the majority of the e-mailed questions were directed, but I felt I could not just speak about the ALPS printer without first running through the whole custom decal creation process. So, here goes. Finally, before I get started, I have a little disclaimer. While I am going to try to be as complete as I can about my custom decal creation, I will no doubt miss some things. What I write is specific to "my way" of doing this process. I make no bones about being right or wrong here. Every modeler (and artist) has there own tricks and styles. No tricks or styles are wrong as long as the modeler is happy with the outcome of their labors. While I am always looking to improve my abilities, I am satified with the results I get using the procedures I am going to outline here.
There are really only two main supplies.
Other supplies I need are dependent on my printing methods. These include printer ribbons and cartridges that are specific to the printers I use to print my decals.
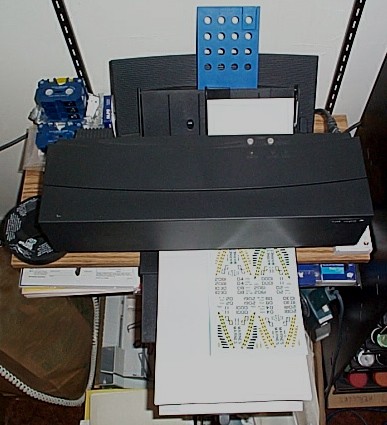
For tools, I need a way to create my designs and a way to print them. This amounts to a computer and two different computer printers. One is a Hewlet Packard 4P laser printer with 600 DPI resolution. The other is an ALPS MD-5000 color printer with up to 2400 DPI resolution. The laser printer is an effective way to create decals when the only color needed is black. The ALPS printer comes into play when creating full-color decals. I avoid ink jet printers for printing decals. Without getting into very specific types of inks and printing processes, most ink jet printers use an ink that runs in water. This is not a good thing when the end result of my hard work is intended to go swimming. And, even if I used an ink jet printer with ink that does not run in water, it will not print cleanly on the decal film because the ink is designed to soak into the paper during printing. It is not able to soak in on decal film and, therefore, has a tendency to run before it dries. The ALPS printer uses a different printing method that has none of these problems, but does have a few of its own that I will explain in the last section of this posting. Since you are reading this posting, you obviously have access to a computer and probably have access to a computer printer. But, as a "low-tech" alternative, you can make due with pen, paper, and a photocopier. I actually did the pen and paper thing for a couple years before I had access to a computer, and it does work. I will not be elborating any more on the "low-tech" process in this posting, though.
Everything in modeling is a step-by-step process. Why should this be any different? Below are the steps I follow when creating custom decals.
Step 1: Create the Decal Artwork ("Master Image")
On the computer I find various software products work well for creating the needed artwork. Which product I use is dependant on what markings I am trying to create. I do most of my work in plain old Microsoft (MS) Paint. I stick with this product because it is available to me for free (after paying for the PC) as part of the Windows operating system. Don't laugh. MS Paint has a lot of function that most people never take time to figure out. I have amazed various friends with what I can do quickly in MS Paint. One issue, though, is that this has me working in bitmap (BMP) files. BMP files can be quite large, even for a relatively small image. To reduce the amount of space that the images take on my hard-drive, I compress the BMP files into GIF files. I purchased a small product called the GIF Construction Set from Alchemy Mindworks Inc. to do the maintenance on these GIF files. The GIF Construction Set uses MS Paint to allow editing of the images stored in the GIF format. This software also provides access to the GIF color pallet that internally controls all the colors of the GIF image. By editting the colors in the color pallet, I can effect the entire decal master image without even having to open the actual image. This is very useful for quickly and easily correcting color balance issues in the master image. I have yet to invest in the immensly expensive Correll or Abobe art products. I have yet to be convinced that they provide anything that I can not do in the other software products already on my PC. This said, though, I have been approached to do artwork for a decal manufacture, and their need of getting the files into EPS format may finally drive me to buying one of these overrated products. I make siginificant use of a scanner to create the initial designs for my decals by scanning photographs and/or drawings. Once scanned, I pull the images into one of the above mentioned software products to clean up the art and adjust it as needed to create clean, printable designs.
When creating the designs, I keep in mind my intentions for using them. As such, I do not place the designs too close together, making them difficult to cut apart and use.
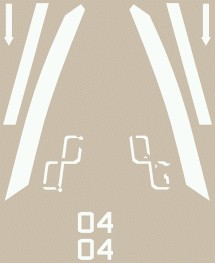
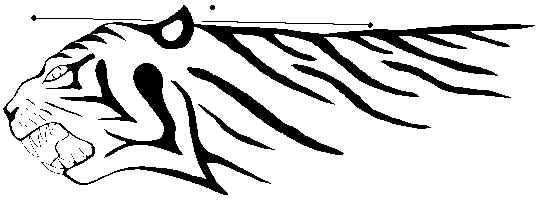
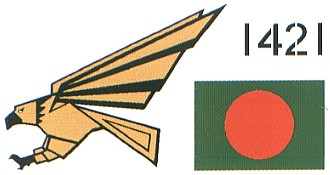
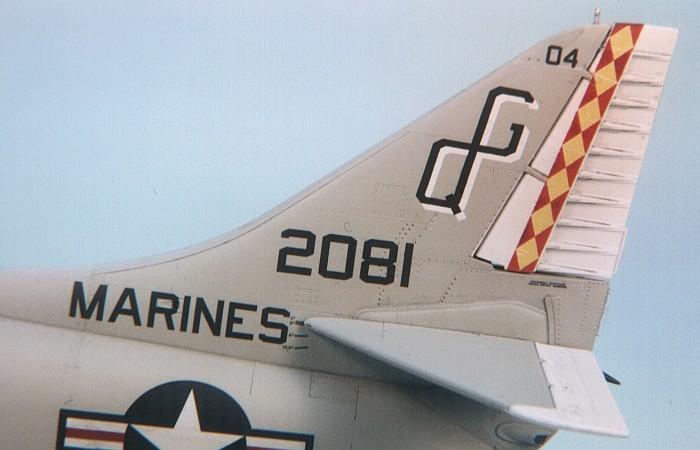
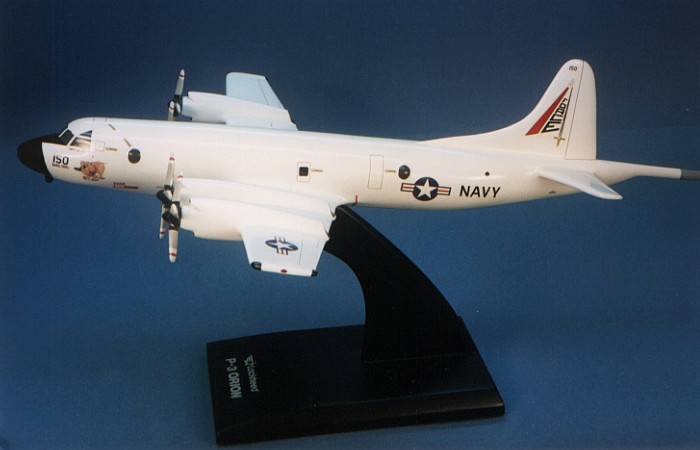
For text in the markings (letters and numbers), I have a couple PC fonts I purchased that provide both US Air Force and US Navy styles of block lettering. I purchased these at TLai Enterprises. This simplifies creating tail codes and modex numbering as I can just key in the characters from the keyboard and get the completed designs. All I need to do is work out the correct size of the writing. The designs I am creating are always quite a bit larger than the decals I want in the end. By working in extremely large sizes, I can reduce the images during printing and minimize any irregularities. The digital nature of the PC makes the edges of diagonal designs appear as jagged lines. The reduction of the designs in printing mostly eliminates these jagged edges and prints a smooth line. To see just how big the master images are that I work on, note the image to the right. This is the left side QG tail code for the A-4E Skyhawk. The jagged edges of this source image smooth out when printed at a reduction to 16% of the original artwork. Note the tail of the completed model, below.
Step 1b: Test Print I test print the master image on standard laser paper to judge its size, details, colors (on a color image), etc... I list this step as Step 1b because I usually am test printing the images all through their creation to verify the details as I go. MS Paint is rather simplistic in its print capabilities. To better control the scaling of the image, I use another procduct, MS Word. Now you are thinking "Huh? Did he write MS Word?" Yes, MS Word. I imbed the GIF images into MS Word and use the properties of the image (found by right clicking the image) to control its size. The image size I prefer working in most has me reduce the image to 16% of its original size. If I need bigger or smaller images, I can step this up or down by 1% increments to achieve the print size I need. The MS Word scaling provides another benefit. By changing the scaling in MS Word, I can achieve multiple scales of markings by just changing the percentage of reduction. If 1/48th scale is a 18% reduction (for example), then 1/72nd scale is a 12% reduction and 1/32nd scale is a 27% reduction -- all using the exact same image file. Nice, huh?
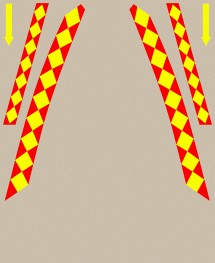
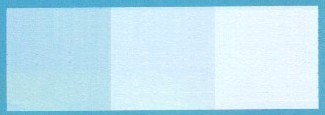
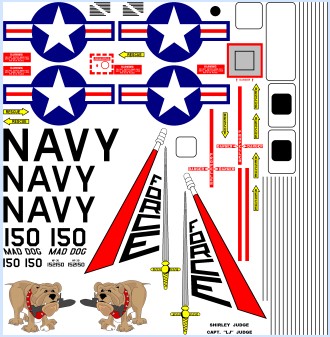
Step 2: Color Separation This step relates only to color images. For black and white images, I skip to Step 3. Color printing on an ALPS is tricky business to get the images to come out just right so they work as decals on a model. It requires separating the master image into component images where each component prints a different part of the whole master image. The colors printed from the ALPS printer are not opaque. To resolve this, it is necessary to print a white undercoat under the color portions of the master image. Thus, they are not as effected by whatever color the model is painted in the areas that the decals get applied. The ALPS printer is the only printer available that can print the color white. The following images show the separations I made in order to print the markings for my A-4E Skyhawk.
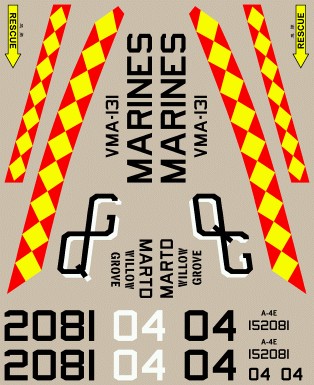
These three artworks combine to created this final image for the A-4E Skyhawk. The ALPS printer prints in passes. By instructing the printer to not eject the paper after the print, it is possible to have it maintain alignment and print additional images in near perfect register. The first pass prints the white portions of the image, including the areas that are undercoating for the colored areas of the decal page. To help avoid white shadowing around the undercoated markings (caused by minimally missing the register of the color print), I will reduce the white undercoat designs by about one pixel all around there edges. This leaves a one pixel overrun for the color print and usually is all that is needed to eliminate any undesirable white shadowing effect caused from the printing. The second pass prints the colored portions of the image. The third and final pass prints the black portions of the image. The Correll or Abobe art products provide for this separation into component images through a process they term "layering". People I have discussed this process with claim it is cumbersome and prone to problems when trying to track the layers. The decal manufacture that approached me to do work for them no longer uses layering, opting instead to do separate images as I have shown here.
Step 2b: Final Test Print Following the separation of the master image into its component color images, I test print the decal image on standard laser paper to verify that the alignment and register of the images is correct. Basically, each component image is imbedded into a word document on a separate page from the others. Setting the margins on all pages to the same values causes the images to align so that each will perfectly overlay the others as they print on the ALPS printer. I print the pages, one at a time, until the full image is printed. Only when the register and details in this final print are satisfactory to me do I move on to the next step. Otherwise, I return to Step 1 and correct whatever problems I find.
Step 3: Print on Decal Paper This step is a repeat of the test print previously made, only this time it is done on real decal paper. The decal paper stock I get comes in 8˝ by 11 inch sheets. To conserve paper, I cut these in half and print decals on the half pages (5˝ by 8˝ inches).
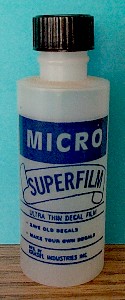
Step 4: Clear Coat the Decals The decals, once printed, are fairly durable, either from the laser printer or the ALPS printer. I don't like to take chances, though. I coat the decal images with SuperScale's SuperFilm to seal the images and make them that much more durable before using them on the model. A quality gloss paint like Floquil Crystal Coat or (probably) Future floor wax would work as good. The trouble with these is that they do not react to setting solutions and act as a barrier to keep the setting polutions away from the decal film. SuperFilm does not do this as it is decal film in a bottle. I brush paint the SuperFilm over the decals and clean my brush using Solv-a-set. SuperFilm dries to almost nothing, so I do not worry about being too thick or leaving brush strokes when applying it. No matter how heavy I apply it, I never have troubles with it leaving any detectable stroke marks on the decals.
Step 5: Apply the Decals to the Model I use the custom printed decals just like any store bought decals. I use Solv-a-set as a setting solution and have no problems with applying them to the models.
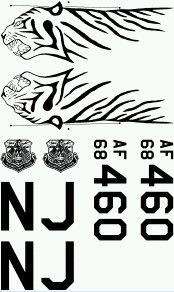
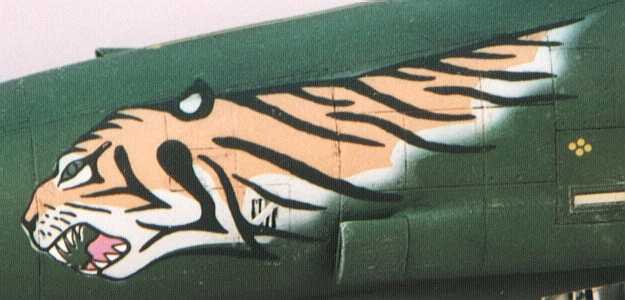
More people have access to a laser printer than an ALPS. Do not sell the simple laser printer short because it only prints in black. Yes, I know there are color laser printers, but most people will not have access to one. Even if you do, the lack of capability for the color laser printer to print white limits the usefulness of the full color markings. I used my HP 4P laser printer for several years before I ever even heard of the ALPS printer. I created lots of really great looking markings using my laser printer. One example is the NJ ANG Tiger F-4E Phantom. To the right is the full image I printed on my laser printer. To create the full color tiger heads, I carefully masked the full color portions of the tiger heads on the nose of the F-4 model using frisket paper. I traced the shapes I needed to cut in the frisket directly off the tiger decal I had printed. The dots and line in the image, just above the tiger head, were used to align the masks on the model. These alignment marks coincide with panel lines on the model. After the painting was completed, I applied the black-only outline decal over the color areas to define the finished marking. The results speak for themselves.
This decal design on the computer with a masked and painted background on the model ... created this marking on the model.
Other projects where only my laser printer was used:
I guess the point I am trying to make is to not think of having an ALPS printer as the end-all beat-all decal creating machine. If all you have access to is a black printing laser printer, the steps I have outlined here can work very well with that printer to make some very impressive decals. All this requires is some imagination and time to create the artworks.
As promised, here is some information specific to using the ALPS printer. If you do not own an ALPS printer and do not care to read about one, you can stop here. Another disclaimer -- these points are directly derived from my own experiences with my MD-5000 and by reading my User's Guide. I also read more literature found on the ALPS web site concerning how the ALPS printers actually work. I can not guarantee any results you might get with your ALPS on using the information I write here. I can only say that it works for me.
Printer Models There are multiple ALPS printers on the market. Because I wanted to also do photographic printing using the Dye Sublimation process, I purchased the top of the line printer, the ALPS MD-5000. The other ALPS printers (MD-1000, MD-1300, MD-2300, and MD-4000) all have lesser capabilities in one respect or another. The Dye Sublimation process is also available on the MD-1300, but that model only holds four ink cartridges at a time. The MD-5000 holds seven. Hence, the MD-5000 requires less manual switching of cartriges during a printing job. I knew I would be using five cartriges frequently (one white plus the four standard colors -- Cyan, Yellow, Magenta, and Black). So for this reason, I chose to spend the extra money and buy the MD-5000. This proved to be a good decision for reasons I did not even know yet. I will write more on this below in the Half-Tone Colors section. Unfortunately, for all those that do not already own an ALPS printer, all of the ALPS printers have been discontinued by the manufacture. The print cartridges and hardware support will be available for several years, but the printers themselves are no longer being sold. They do come up on E-Bay from time to time, so you can get one if you work at it. For the best results, you will want to buy an MD-5000 (if you can find one).
This information is condessed from what I read on the ALPS web site. Unlike an ink jet printer, the ALPS printer uses a dry "ink" to make its printing. The "ink" is actually a resin that is impregnated onto a thin cellophane tape and wound onto spools inside the print cartridges. Micro-small, heated needles in the printer's print head melt small dots of resin off the cellophane tape and onto the paper to make the printed image. Hence, the images are not water soluable and have an amazingly long life without fading. The web site literature claims the printed images from an ALPS printer are more color-fast and fade resistent than actual photographic images. I have yet to put this to an acid test, but it sounds good. The Dye Sublimation process is a bit different. There is an actual dye impregnated onto the cellophane tape that is chemically matched to transfer onto special photographic paper (available from ALPS and other sources). This dye does not transfer well to any types of paper that lack the chemicals found on the photographic paper. Attempting to do a Dye Sublimation print on non-photographic paper can damage the printer. Watching the printer print an image is a bit of a treat. It prints the entire image in one color, then sucks the paper back in to print the entire image a second time using the next color. This repeats multiple times untill all the needed colors have been printed to the image. If the printer needs a color not currently loaded into the printer, it stops and displays a message on the PC screen that asks for the appropriate cartridge. You can then open the printer, swap in the requested cartridge, and close the printer. The printing then continues as if nothing happened. Watching the image grow one color at a time is rather neat (at least to me). Because of this repeating process, a printing of a single image can take quite some time. Printing an 8 by 10 inch photographic enlargement can take upwards of 20 minutes for the printer to complete its printing. Using the standard ink cartriges on normal 8˝ by 11 inch paper generally takes around 2 minutes for a full-page, full-color image. Printing a normal 8˝ by 11 page of just black text takes only one pass and about 20 seconds. Special cartridges for the printers provide the ability to print in metalic colors. This is not limited to only silver and gold, but includes cartridges that allow full-color graphics in metalic colors. I know, this has little to do with modeling, but it is a cool feature. I have used the metalic silver and gold in various decals with great results.
The ALPS printers, like most color printers, make colors by mixing small dots in varying densities so that the final image approximates the actual color it is intended to make. This is OK for printing output for presentations at work. It is less than desirable for model decals. "Newspaper print" graphics are not so great when the markings are supposed to be solid reds, yellows, and blues. I have found a way to reduce this half-toning effect, but it works only because I use an MD-5000. None of the other printers in the line have the capability. There is a special print paper created specifically for the MD-5000 printer called V-Photo Print Film. It is a very thin, almost plastic-like paper with an extremely smooth finish. Selecting V-Photo Print Film in the print output dialog for the printer enables 2400 DPI printing on the printer. At 2400 DPI, the half-tone dots are nearly impossible to really see and the colors turn out much smoother than they would appear at the 600 DPI of a standard print. On V-Photo Print Film, I can make photographic prints using the standard ink cartridges that compare favorably to the Dye Sublimation prints made on true photographic paper. Thus, to minimize the half-tone effect when printing decals images on decal paper, I lie to the printer and tell it I am printing on V-Photo Print Film. This makes the printer use 2400 DPI printing on the decal images and greatly improves the output quality. Fortunately, the decal paper is smooth enough that the printer does not seem to be adversely affected by this little white lie. For those with printer models other than the MD-5000, I have no silver bullet for you on this. My understanding is that the printers work the way they work and you need to tinker with them to find other ways to beat this issue.
I still have a half-tone grain in my color images, even at 2400 DPI. Hence, no ALPS color output can compete with a silk-screen printed decal as printed by most all of the decal manufactures. There are also some limits on the colors. For some reason, yellows and oranges are really hard colors to get the ALPS to print with the proper color shift. Yellow seems to always be too much of a lemon-yellow, not a gold-yellow. Oranges are generally too red or brown. Black and white output, on the other hand, does compare quite favorably to silk-screen printed decals. This is due in part because black and white do not use half-tones to create the colors. The ink is trasfered to the paper in a solid color printing style that has no visible grain in the image. Metalic silver and gold inks work the same as the black and white ones and provide solid colors with no half-tones. One caution -- attempting to get 2400 DPI print by using the Dye Sublimation process on decal paper (if you have an MD-1300) is tempting, but is potentially harmful to the printer. The printing process for Dye Sublimation is chemically designed to only work on photographic paper. Any other paper, including decal paper, lacks the needed chemicals on the paper surface and can end up damaging the printer.
The saturation of many colors, especially lighter colors, after a single printing pass is rather pale. To get good solid reds and yellows when printing, I need to run multiple passes of the color print image. This is true of the white ink as well. A single white printing is not fully opaque. I routinely run three passes of white print to get a solid white that is opaque. I do the same on color printing passes, using three printing passes of the color image to make the colors more vibrant.
Putting this in perspective, I made seven printing passes to creat my A-4 Skyhawk decals -- three white followed by three color followed by a single black pass. As I mentioned earlier, the printer is not fast at printing, especially in the V-Photo Print mode used on the color passes. Adding the time together to do these seven passes of printing amounts to nearly fifteen minutes I spent printing one set of the Skyhawk decals. I have read in various places where running multiple passes through the printer causes the print head to scuff off the already printed colors as it prints the new ones. I do not know what printer models the people writing this were using. To date, I have yet to run into this issue with my printing on the MD-5000. I do get occassional scratches in the images, caused by the print head. These can easily be fixed by quick touch-ups in appropriately matching paints after the decals are applied to the model. I needed to do this touch-up on the diamond sashes of my Skyhawk in a couple places.
The register of the markings as successive passes are printed on the decals is near to perfect. I have yet to run into any problems with the register of the decals (caused by the printer). When mixing print styles (standard and V-Photo), I have found some discrepancies. For whatever reason (I have no idea), my ALPS printer prints V-Photo Print at an ever so minimally different vertical dot pitch than standard print. This has the effect of causing my white undercoat to be progressively more and more off register with the color print as I move down the decal image from the top of the page. This pitch mismatch amounts to about one pixel row for every inch of decal image. This means that designs at the top edge of the decal image are in perfect register while designs one inch from the top are missing each other by one pixel. Two inches down, the miss is by two pixels and so on... I compensate for this in three ways. First, if I only have a couple full-color designs on a given decal sheet, I keep them grouped together at the top of the decal image. Second, if I have to place some full-color designs further down inside the overall decal image, I carefully reposition the white backings so they properly line up with the full-color designs. This is tricky as the white design backings really do not line up with the full-color designs if you counted the pixels in the image files. But the printer having a different dot pitch accounts for the difference in the pixel counts. A third way I work around this issue is to print the white backings separately from the full-color designs. This way, each full-color design is actually two decals to be applied to the model, one over top of the other. I do not like using this method as it makes for thicker overall decals on the model, but if the decal sheet is all full-color markings, this may be the only way to effectively work out the register of the designs.
I hope this helps some people with any issues they have run into with custom decals printing. If you have any questions that you want to send me, just drop me an e-mail. I would be happy to try to help however I can. Models, Description and Images Copyright ©
2000 by David AungstPage Created 19 March, 2001 | |||||||||||||||||||||||||||||||||||||||||||||||||||||

 Equally, I do not separate them too much, which will waste decal film. To find a happy medium, I experimented with this until I got a feel for the space I needed to leave in the master image between designs.