|
A Custom Made
Model Room
by Scott Brown
|
 |
|
Scott's Custom Made Model Room! |

HyperScale is proudly supported by Squadron
When my lovely bride and I decided to take the home ownership plunge
a while back, I was thrilled at the prospect of having my own "model
room". Until then, we had lived in a variety of rented houses and
apartments. I have modeled in closets, on porches and in rooms shared
with my daughter, but nothing I could really call my own.
The plan we had built is a 3 bedroom with studio option. Perfect I'm
thinking, I'll either get the studio or one of the bedrooms. When I
broached the subject, I was politely informed that there were no plans
for me to have a model room, thank you. We were going to have a "guest
room"....I suppose for all those over night guests we entertain so
often. My wife laid down the law, "you can take all that stinky stuff to
the garage" I replied "But puddin', sweetheart, baby doll, it's
really hot out there, and full of bugs....you know how I am about
bugs" She nonchalantly says "so, build you a room out there"
Hmmmmm, intriging notion, except I'm totally inept at things involving
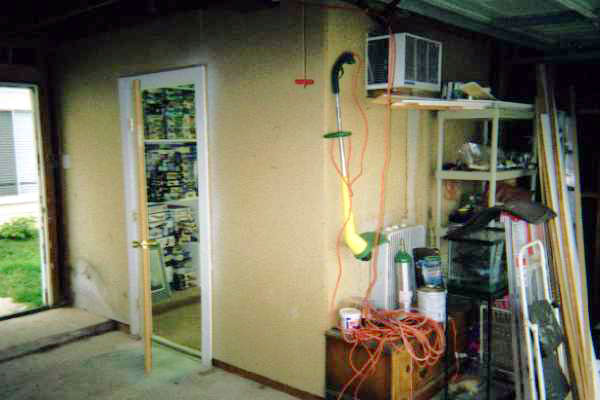
hammers, nails and especially electricity. I went out into the garage
and looked. I deduced that I could fit a room 12'x 8' in the corner, and
still have room for the garage door to open and get 1 car in there. So,
I'd need 2 walls and a ceiling.

I contacted a few contractors and was stunned at how much they wanted
for such a project.
Okay, I have friends who constantly brag about being handy, we'll
quaff a few beers, and toss up a couple of walls, I mean, how hard can
this be? Now, the secret to things like like this, is to trick then into
coming over, usually under false pretences. Then, all you have to do is
stand there, looking forlorn, and the natural male instinct to
completely take over a project will kick in. I started with my own
family.
One weekend my parents were down. We headed off for the lumber yard,
returning with a stack of 2x4s and some nails. I conned my father-in-law
into coming over, and he just went insane looking at the mess we were
about to make. Bingo, my first victim! He returned with an air
compressor, a nail gun, and this other nail gun that shoots rifle
cartriges. In no time flat, he had nailed a base directly into the
concrete of the garage floor, and we had both walls and ceiling frames
done in a few hours. Man, nail guns are magic!
Like all projects that I get involved in that are outdoors, this one
was begun in June. The thought of hanging sheetrock in June in Houston
made me want to die, so the rest was put off until the fall. Now, here
was the tricky part. I know exactly squat about sheetrock, but I had 2
friends, Josh Bowling and Richard Kern, who claimed ultimate knowlege of
things large and flat, like some mystic power, passed down thru the
ages. The hard part was getting them both there at the same time. This
was accomplished through sheer force of will, constant pestering and
downright begging. I managed to get both of them there along with a pile
of sheetrock, and off we went.
Very quickly we had the walls done, then came the ceiling. (BTW, in
case you ever hire a couple of sheetrock gurus, it's a LOT easier if you
start with the ceiling first.) After some very colorful language, the
ceiling was done, and we had the whole thing sealed and caulked.
Childs play compared to the electricity, as it turned out.
Josh and I spent an entire evening, me at the breaker box, him at the
light switch, yelling at each other. "OK, try it now!" "****, turn it
off!" "OK, try it again!" "%%%%, shut it off!" Eventually, through blind
luck I think, and 11 trips to the Home Depot, Josh managed to get it
lined out without burning down the garage. He wired in a standard
kitchen fluorescent light fixture in the ceiling, and I run a 110 v,
1,200 BTU window A/C unit, 2 sets of under counter fluoros and 2 desk
lamps. I thought it would exceed the breaker capacity, but I haven't had
any problems with it yet.

I used standard insulation in the walls. I thought I was going to
have to insulate the top, but it is plenty insulated without it. On a
100 degree day, I can get the room to 68, and the temp will only go up
10 degrees in 3 hours. During winter, the room heats up rapidly with
just a low power space heater. I thought about a ceiling fan, but there
was no need.
I wasn't too picky about the finishing, I just sprayed stark white
latex on the walls. The door came pre-hung from Home Depot, and I used a
cheap carpet remnant, cut 12'x8' for the floor.
The entire project came in under $1,200, incl. the A/C unit. My only
complaint so far is the lack of ventilation. That room is TIGHT, and
fumes build up rapidly. So far, it's just a matter of opening the door
for a few minutes, but soon I'm going to put in a bathroom vent.
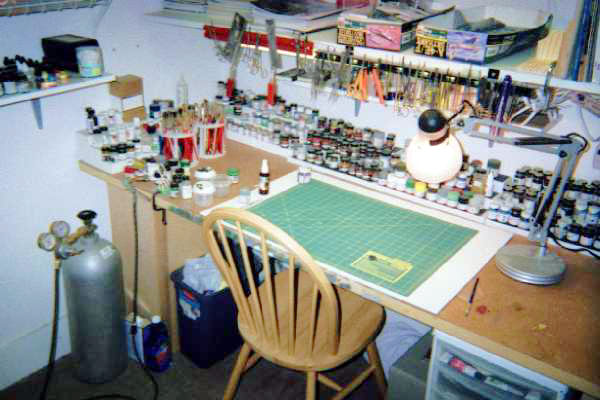
My bench is a standard interior door mounted on 2 kitchen cabinets. The
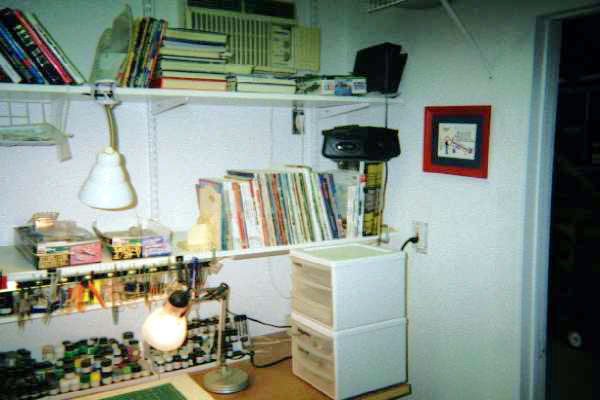
shelves are particle board on L brackets for the rear storage, the ones
above my desk are from Container Store, but I needed to have them be
sturdy because they have all my books on them. I have 2 magnetic tool
holders mounted on the lower shelf, handy for keeping all the hemostats
and files, scribers etc. out of the way. The paint racks are kitchen
spice racks that look like steps.

It's very bright in there with the white walls and all that light.
I've noticed that it is a lot less dusty than in my house. I am just
thrilled with how it all turned out. Everybody is happy.
Now, I have taken some good natured shots at Rick and Josh, but truth
be told, they did an outstanding job. You really find out who your
friends are in an undertaking like this. I had a lot of people talk big,
but when the rubber met the road, these guys made this thing happen, and
not to sound too corny but I could not have done this without them. I
want to extend my sincerest thanks and admiration to Josh Bowling and
Richard Kern. I feel very fortunate to count you both as my friends.
Feel free to mail me if you have any specific questions. My hope is that
this might solve somebody's similar problem. Josh and Richard work
cheap.
Scott Brown
|
Scott's Custom-Made Model Room in Detail |
Click the thumbnails below to view
the images full-sized.
Use your browser's Back Arrow to return to this page:
Text & Images Copyright © 2003 by
Scott Brown
Page Created 01 May, 2003
Last Updated
19 April, 2004
Back to Reference Library
|
Home |
What's New |
Features |
Gallery |
Reviews |
Reference |
Forum |
Search