|
Building Dioramas
Part Two: Hangar
Projects
By Helmut Latoschinski
In this second article about building dioramas we will turn to a more
complex theme - building a hangar to act as a background for your models.
You cannot buy anything like this on the commercial market even in 1/72
scale, but you can find the materials you need.
It's time for scratch-building!
In my earlier article we explored the issue of the depth of an image.
This theme comes up again if you want to depict the hangar with partially
open gates (maybe moveable). Is there a way to disguise the fact that your
hangar is only about 10 cm deep, instead of 30 meters?
 |
Lightfall, top-view, b/w reverse
|
| Light falls into a dark room like a fading cone; at
the end there is darkness |
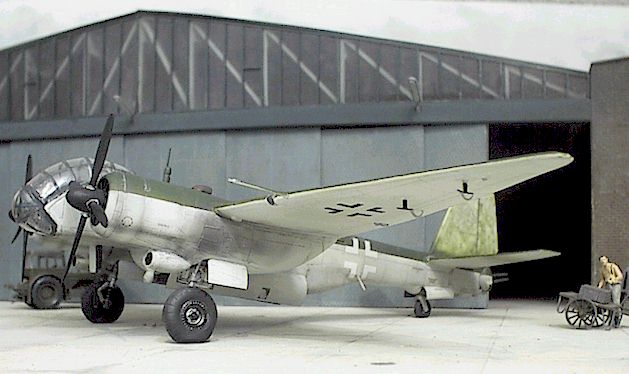
If our back wall is inside this cone, we can simulate the effect by
colouring the back wall in black, and lighting the vertical area like the
horizontal cone would. But this representation does not work if there is
full light through the opened gate, flash light or low-angle of light from
the evening or morning sun. Under normal circumstances you will not
recognize anything inside the hangar because of the great
light/dark-difference (see result photo).
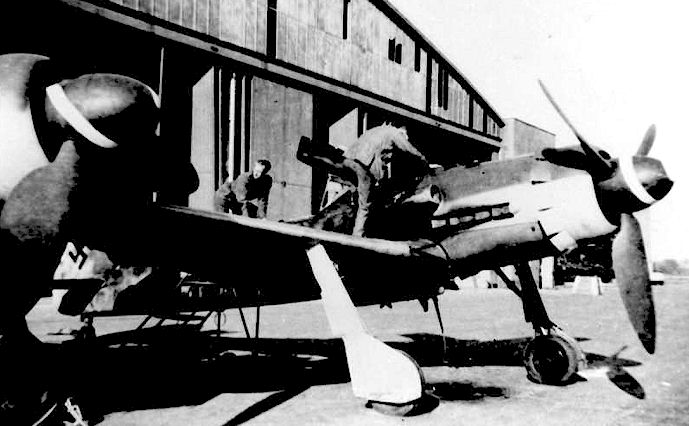
Your hangar design can be purely imaginary, but for maximum realism it
is helpful to use reference photos. There are several styles of German
hangars. These range from small buildings on combat airfields for the
maintenance, or huge structures for production or evaluation purposes.
Reference
Let's take a look at some photos illustrating different hangar types:
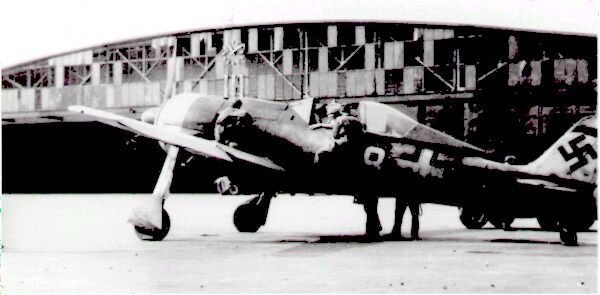
One interesting point about these photos is the construction of the
doors. In the second photo, each segment pivots and slides, and appears to
be divided into four sections. Different designed doors, hung on separate
rails and subdivided into 8 elements, can be seen in the first photo.
Above the doors in both designs there is glazing with narrow windows.
I chose this style of the second depicted hangar.
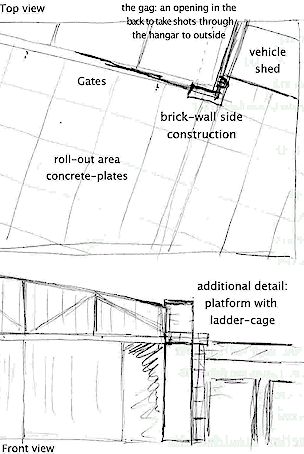
Planning
| Here is the original sketch I made after reviewing my
reference pictures.
You can design the scene with "clear" lines in squares or
rectangles according to the ground plate.
To get more realism into the design, I planned to apply the
buildings in a sharp angle to the ground plate in order to increase
the illusion of perspective. As an additional benefit, the frontline
falls back and you get more space to display the models.
I had the idea to open the back wall to take snapshots from inside
the hangar to aircraft located outside. There are some nice original
shots with such a view from the Focke-Wulf specimen factory at
Delmenhorst-Adelheide (Fw190d11/ Ta152; Jet+Prop 5/97).
If you want to have more "life" in your design, you may add some
details, like a platform.
|
 |
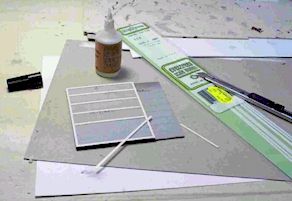
Materials
Before beginning work, you will need some materials. I did some
shopping for the following items:
- plywood for the ground and back (I used 55 x 45 x 0,9 cm for the
ground and 55 x 18 x 0,6 for the back)
- Oil-putty for the ground (you will need a lot, model-putty is too
expensive for basic works)
- thick cardboard for the main construction (2,5 mm)
- brick-plates, roof plates from model railroad (Vollmer has the most
realistic brick-plates in 1/87)
- styrene sheet for the gates
- clear styrene (0,3 mm) for the windows
- grid sheet and handrail for the platform (Brawa)
- several styrene profiles:
- rectangle channel 9x16 mm to suspend the gates,
- rectangle 2x4 mm for the vertical supporters,
- angle 2,5 mm for the diagonal supporters,
- square 1x1 mm to create the windows and rectangle 1x2 mm for the
inner gates,
- all by Strip Styrene from US
- I found a thin sheet (0,2 mm) with a fine rhombus structure for the
outside gates (huh, expensive !!!)
- the ladder-cage was taken from a 1/87 signal-bridge (Brawa, out of
production), it fits exactly
- Roco (Austria) offers a fine vehicle shed in 1/87. It's dimensions
also fits for 1/72.
- I had saved models of large electric devices for years: drillers,
slicers and so on, they will be used for the equipment inside the
hangar.
|
 |
The first job is to apply putty to the
ground plate. I used a cheap oil-putty for the basic coat, applied in
a layer of 0,5 - 1,00 mm.
I scattered some real cement on the wet putty, but that was of no
use and I sanded it down later.
I had better luck with portraying details. I pressed the structured
back of a nail-head into the wet putty to get sewage-covers.
|
 |
The next step was sanding. I used my
Bosch-Delta-Sander because I hate manual sanding. There was a lot of
work left - filling many scratches and fine-sanding (this time
manual). |
 |
After sanding you can see the fine
structure of the sewage-covers.
|
 |
Now it's time to assemble the back and
the main walls. I started on the inner coat of 2.5 mm cardboard, then
the brick-walls. This photo shows the temporary supports to hold the
walls during construction. I used only cardboard & hot glue for these
walls.
I also engraved the joins between the concrete plates with the back
of my X-Acto-Knife at this stage. The 3-D result is much better than
painting.
|
 |
The next step was to mount the main
support that suspends the gates.
Now the scratch-build theatre begins! At first we need to assemble
the vertical supports - you need to calculate the correct inclination.
The best way to glue this styrene is cyanoacrylate (gap filling
type). The parts hold even better if you sand them before gluing.
You can see the black coloured inner side of the hangar in this
image.... |
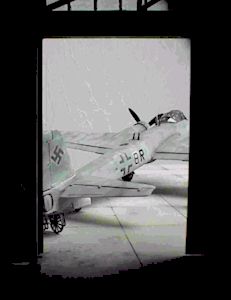
 |
...while in this picture you can see the
fading light cone, visible if the first gate segment is open.
The next job was the windows. I wanted to get a milky weathered
effect. The best way to do that was sanding the clear sheet with fine
sandpaper (600). To avoid painting problems, I painted the 1x1 mm
window frames before gluing them to the clear sheets with Humbrol
Clear-fix. |
 |
There is another detail to build - a fine
grid-tower is located direct behind the front wall as a main support.
It was taken from the Brawa signal-bridge.
Before applying the windows the diagonal supports (angle-profile)
were fitted and sprayed in light grey. |
 For
the main roof you need more than one plate. They were glued with
super-glue, the joint was filled and sanded. I applied a copper angle
to the edge. For
the main roof you need more than one plate. They were glued with
super-glue, the joint was filled and sanded. I applied a copper angle
to the edge.
Now it was time for the main paint job: Painting and weathering the
brick-walls and the roof, also the concrete.
It was more difficult than I expected to get a realistic result.
Sometimes it was too dark, sometimes too light. It took about 5 layers
to get the result I wanted. The last layer was thinned white to
lighten up the centre of the plates.
After this, I applied a wash to the join-lines between the concrete
plates. I brushed water on areas of 20 x 20 cm, waited a little while
and then applied thinned black colour at the crossings. The colour ran
along the line itself by the "capillary-effect" and faded out.
Sometimes there was more colour left, sometimes less.
The sewage covers were painted with Humbrol Metal-Cote and softly
polished with cotton-sticks. |
 |
One of the last big jobs was to build
the doors. The door elements were designed for dimensions of about 5 m
width and 8 m height. I think that the original was a little
smaller.
4 of 6 doors were built in a fixed construction, the last two as
one movable element. I applied a skin of corrugated foil after gluing
the frames. Some lines had to be scribed. I sprayed the finished doors
with a medium blue, and toned it down with thin layers of grey.
Weathering was achieved with heavily thinned dark brown, sprayed in a
very low angle to highlight the structure. |
Vehicle
Shed
The vehicle shed had to be modified because of the sharp angle of the
design. I had several problems with the Roco-styrene. Usual styrene cement
did not work, even super glue took a long time to stick. But the kit
itself was fine, especially the movable gates and windows.
Building the platform was the next challenge. I had planned to build
this platform on the sidewall and front, but it was "overdetailed" to me,
so I left it at the side. Pure scratch-build! It was difficult to apply
the fine handrails, but it finally worked.
The last task was to build a workshop inside the shed along the
brick-wall. I installed an inner platform (usually not visible) with
lights from model-railroad (9 to 12 volts). This was so difficult, that I
decided to build the installation separate on a base of clear sheet
styrene.
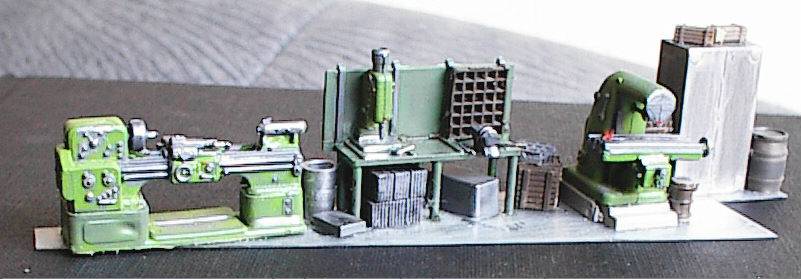
 My
spares box came in very handy for this part of the project. I used parts
that I had been collecting for years! My
spares box came in very handy for this part of the project. I used parts
that I had been collecting for years!
Some 1/72 scale bases had to be elevated for a more realistic
appearance.
Metal parts were painted with Metal-Cote. After polishing you get very
realistic results. I added some fine tools from Preiser.
This photographed assembly (above) is about 2 cm high and 10 cm long. I
was glad to use my new digital camera this time. This high-resolution
camera from Hewlett-Packard delivers well-detailed and clear results.
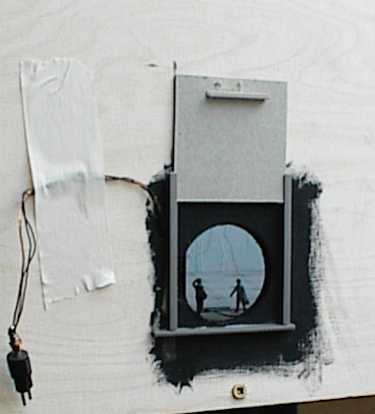
Finally, I opened a hole in the back with a hole cutter and installed a
lid to open the hole as required. The lid is covered by dark grey paper on
the inner side. On the shot you can also see the electric installation.
Here are some more photographs of the completed base:
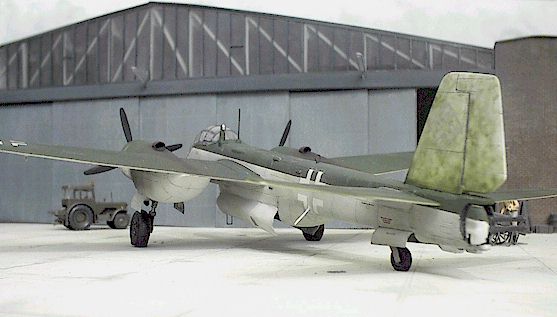
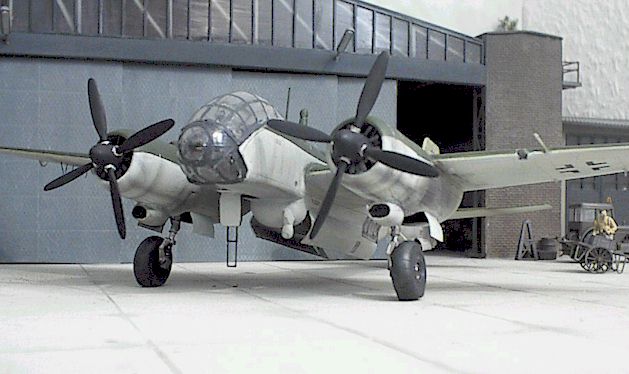
This is a Junkers 388L reconnaissance aircraft. It is the Kora resin
kit.
You can see some tools right from the opened gate. I will use them for
elevators ("Aufbocken"). There are many photos showing maintenance using
those elevators. At first, I decided to scratch-build them, but I had the
chance to find something that would fit.
 Building
a hangar is a more challenging project than simply putting trees on a
piece of wood. You will have to do much more detailed planning and
calculation, otherwise you will have problems. Your abilities as a
modeller will be stretched, and good tools will be essential (mini razor
saw for example). Building
a hangar is a more challenging project than simply putting trees on a
piece of wood. You will have to do much more detailed planning and
calculation, otherwise you will have problems. Your abilities as a
modeller will be stretched, and good tools will be essential (mini razor
saw for example).
This is not a project for a beginning modeller. But if everything
works, you will get an impressive scene in which to present your models.
Pricing is much cheaper than the airfield project. All together, I
spent about 100 DM (40 US$).
Try it! This example can adapted to typical hangars all over the world,
historic or modern. It will be possible to get the necessary material, and
with a little luck you may even get useful kits for secondary buildings,
equipment or vehicles.
In any case you will have something unique - not a kit that everybody
has.
My last hint is not to plan your diorama too small. You may put a lot
of work in only to discover that you can't get an acceptable shot of your
model.
I hope you have enjoyed this second article about building dioramas.
Maybe there will be a third one about modifying vehicles and figures
later. Any comments are welcome.
Text, Models and Images Copyright ©
1999 by Helmut Latoschinski
English brushed up by Russ M. Field
Original Wartime Images Copyright © 1999 by Charlie Swank
Page Created 25 November, 1999
Last Updated
23 January, 2002
Back to
HyperScale
Main Page
Back to
Reference
Library |
 Home |
What's New |
Features |
Gallery |
Reviews |
Reference |
Forum |
Search
Home |
What's New |
Features |
Gallery |
Reviews |
Reference |
Forum |
Search