Home |
What's New |
Features |
Gallery |
Reviews |
Reference |
Forum |
Search
Home |
What's New |
Features |
Gallery |
Reviews |
Reference |
Forum |
Search
|
|
|
Making Scale Pavement by
Ian Sadler
There are many
different types and styles of pavement used in countries. It is therefore
essential to research what pavement is applicable for the period and geographic
region of your modelling subject. I have provided a few
examples of types of pavement.
This is a brief outline
and does not cover all types and styles, but might give you a basis for further
research.
The pavement I am going
to build is the typical Western European style used from the 18th
Century to the present day. However, parts of Europe have their own style of
narrow pavements that are normally found in small villages. These are based on
the Roman style but using more modern materials. Mark out an area on the baseboard of your diorama and measure it up. You need the length and width.
If you are making a
section that continues around the corner you will need a second straight piece
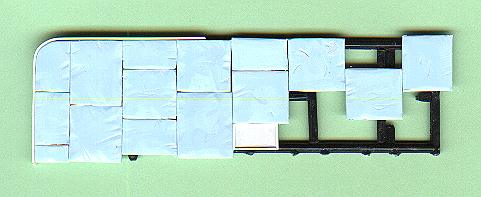
of the same width. Place the sprue on the
modelling board and trim to shape but do not glue it down. Fill in any large
gaps with straight pieces of scrap sprue and glue in place. Then take a sheet of
plastic card 30th thick and cut a strip about 22mm wide along the longest side.
Cut into around ten separate pavement sections approximately 17mm wide. Glue the first pavement
flag onto the corner section overlapping the rounded part of the sprue. Then
turn the next flag 90 degrees and glue along side the first. You should now have
a stagger along the front edge. Repeat this until you have used each of your
pavement sections. Depending on how wide you make your pavement you may need 3
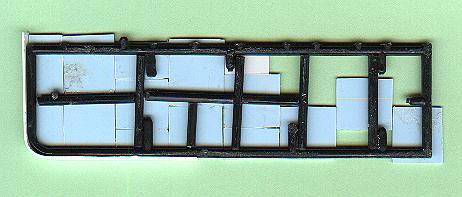
or 4 strips to fill it in. Now cut each separate
flag to fill in the gaps at the rear of the last set of flags. Do not worry if
they overlap the back edge. Leave the pavement to
dry at least two or three days, Now trim the rounded edge on the first flag and
all along the front edge. Next measure the total height of the paved area and
cut two strips from 40th plastic card. Starting at the corner end glue and bend
the first strip along the front edge of the sprue. You will most likely need
clamps to hold it in place, again leave to set hard, Then starting at the same
corner glue the second strip on the front face of the first. This is to form the
kerbstones. Leave to harden off at least a week. Now round off the top
edge of kerbstones to give a stone edge profile. When satisfied mark off
vertical lines every 3ft in scale up and over the top of the kerbstone and
scribe in. Trim off any
overlapping sections at the rear of the pavement and for a little time and
effort you have your own pavement. The same procedure can be adopted for any of
the styles or types in the first part of the article.
Text and Images Copyright © 2001 by Ian
Sadler
|