|
Photographing
Your Models
Part One
By Brett
Green
|
The
Illusion -
A 1/48 Scale Messerschmitt Bf 109 G-6
built by Chris Wauchop |
This article offers a introduction to some of the basics of photography and its
application to getting good pictures of your models.
For a more detailed discussion of model photography, see Robert Pounds' Part Two.
IPMS New South Wales is fortunate to have a resident professional photographer. The work
of Pieter Stroethoff will already be familiar to HyperScale regulars. His photographs are
the source of the images in many of our earlier Feature Articles and Gallery Entries.
Pieter’s photographs are always a great source of inspiration for me. He has a good
quality SLR camera using multiple synchronised flashes, and a "light box" with
interchangeable painted backgrounds. The results are consistently impressive.
Although Pieter was always happy to take photos of members models either completed or
under construction, the downside was that there was only one IPMS meeting per month to get
these photos taken!
I began taking my own model photographs a few years ago when I was editing the local
club magazine (IPMS News and Views), and contributing armour articles to Track-Link. Early
results with flash photography were poor, so I looked for alternatives that would give me
reliably acceptable pictures.
This article outlines the techniques that have worked for me. This does not imply that
it is the only way to take photographs of models - the key is to keep practicing
and experimenting until you come up with a technique that works for you.
| E
s s e n t i a l E q u i p m e n t |
Essential equipment required is a 35mm SLR camera with either manual or aperture-priority
automatic settings and a tripod. It is also desirable to have a zoom lens in the range of
approximately 35-70mm and that the camera is equipped with a self-timer.
| T
h e P h o t o S t u d i o |
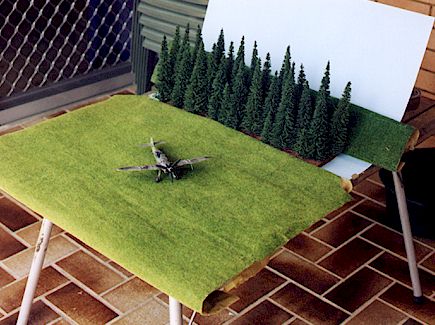 |
| ...and
the reality - a small folding table with cardboard, railway grass and a clump of plastic
trees! |
My "photo studio" is a shady section of my back verandah. When I want to take
model photographs I erect a small table and attach a sheet of plain blue to the top of the
table. I tape this cardboard down at the front and the centre, and prop up the back to
create an artificial sky. Recently I have laid a sheet of "railway grass" to
represent groundwork. Chris Wauchop has also built a miniature forest of pine trees to
help break up the horizon, although a similar effect might be achieved with a large scenic
poster or calendar page The studio is completed with the tripod and camera set at close to
table-top level to give a "spectators" perspective to the subject.
| C
a m e r a S e t t i n g s |
The three keys to a technically successful model photograph are good depth of field;
appropriate exposure giving bright, even lighting; and focal length. Many
modern cameras have "programme" settings that select both shutter speed and
aperture. You should not select this option when photographing your models.
Optimising Depth of
Field
"Depth of field" refers to how much of the
picture is in focus. The ultimate aim is normally for the whole subject to be in focus. To
achieve this, the aperture should be set as small as possible. The aperture setting
simply indicates the size of the opening in the lens. The smaller the aperture, the larger
the "f stop" number. So to select the smallest aperture, set the lens at its
highest f-stop setting - probably f.32 or f.22.
To maximise the depth of field, focus approximately one third back from
the nose of the model.
Setting Exposure
|
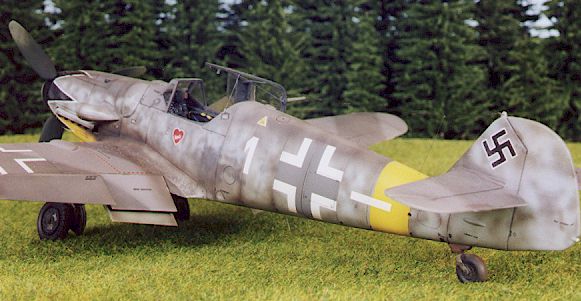
Image 1 - Photograph taken at f.32 using
"automatic" shutter speed and scanned with no further manipulation |
The aperture setting has been selected as above. The very
small aperture means that not much light will get to the film, so a longer exposure
will be necessary. This won’t be a problem if you are using a tripod.
If you have an automatic setting on the camera, the shutter speed will
automatically be selected for you. If you are using a camera on manual mode, set the
shutter speed now.
|
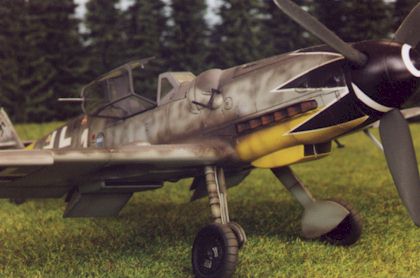
Image 2 - The same subject, the same angle, the
same aperture but at one stop slower. Image has been optimised using gamma
adjustment and manipulated with a "sharpen" tool before being saved as a *.jpeg
file. |
Scanning will tend to darken and increase the contrast of images.
Photographs taken for the Web should therefore be slightly lighter than standard
snapshots. I "bracket" my photos to ensure that I get the most appropriate
exposure for the Web.
"Bracketing" means taking the same photograph at different
exposures. I usually take one photo at the shutter speed recommended by the meter, plus
one more photo at one stop slower. "One stop slower" means double the
recommended shutter speed (i.e. if the meter recommends 1/2 second, set 1 second
manually). For detail shots in shadowy areas such as cockpits or vehicle interiors, I will
sometimes take a third shot at two stops slower (i.e. four times the recommended
shutter speed).
Focal Length
In general terms, a wide-angle lens (e.g. 28mm) will distort an
image, and a long telephoto lens (e.g. 200mm) will tend to compress the same image. Either
effect may detract from the realism of a model photograph. I prefer a focal length of
between 50mm and 70mm. In other words, if you have a zoom lens, try to keep the zoom
between 50mm and 70mm.
Taking the Photo
Once the camera is set up for the shot, it is time to take the
photo. Camera shake can be a problem effecting the sharpness of a photograph. This is a
particular problem when shutter speeds are slower than 1/30 second - and with photos taken
in shady locations at such small apertures the shutter speeds will certainly be this slow.
My photos are often taken at exposures of one or even two seconds. At these shutter
speeds, the use of a tripod will be essential. To further reduce the risk of camera shake
during long exposures, I use the self-timer function on the camera. An alternative would
be to use a remote shutter-release cable.
| S
c a n n i n g a n d P r o c e s s i n g I
m a g e s f o r t h e W e b |
The cost of a flatbed scanner has fallen dramatically over recent years so that it is now
within the financial reach of many PC owners. However, the scanner is only one part of the
web-processing equation. Image processing software plays, if anything, an even more
important role in determining the "look" of your model photos on the Internet.
Until recently I used an Optic Pro 4800P scanner which cost me less than A$200
(US$140). This scanner has now been replaced with a Umax Astra 610P. I scan most of my
photos at 100 dpi. Any higher resolution results in a wastefully large image that will not
fit on a screen. I find that lower resolutions (e.g. 75 dpi) limits flexibility to crop or
resize the image.
Before saving the image I will determine if further processing is required. Very often,
the raw scanned image will be too dark. I use a software package called
"Picturama" that allows me to improve the overall density of the image with a
tool called "auto-density". I can then fine tune the "gamma",
brightness, contrast and sharpness of the overall image. When I am satisfied with the
result, I will crop or shrink the image depending on the plan for its ultimate
destination. Finally, I save the image as a .JPG file.
As mentioned before, this is not intended to be a strict guide to model photography.
Hopefully it will provide some ideas or answer some questions that may help get you
started. After that it is just a matter of practice and experimentation.
And when you’re happy with the results, why not send in some of your scanned
images (or even hard copy photos by snail-mail) for inclusion in a HyperScale gallery?
Happy snapping!
Got to Part Two of "Photographing Your
Models"
Text and Photographs Copyright 1998 by Brett Green
Page created on Monday, June 01, 1998
This page last updated on Thursday, May 09, 2002
Back to The Reference Library
Back to HyperScale Home Page
|  Home |
What's New |
Features |
Gallery |
Reviews |
Reference |
Forum |
Search
Home |
What's New |
Features |
Gallery |
Reviews |
Reference |
Forum |
Search