|
With the warmer weather and outdoor chores starting up, my modeling time
has been in short supply. I also have gotten hooked on a computer game ("StarCraft")
which takes up time I usually would be doing modeling. With these factors
weighing in, my original plans at a quick finish to the U-2 project that I
have been working on have been shattered.
I have already made a couple of "firsts" on this U-2 project. The first
"first" involved my making resin update set masters for a model and getting
them get marketed. The other "first" is that this is the first model that I
have re-scribed an entire model to engraved scribing. I have gone to great
lengths in the past to replace lost raised scribing using a variety of
techniques, but I decided on this model to try out the process of
re-scribing and see how it works.
Having read a number of questions recently online regarding how to do
re-scribing, I decided to take a break from the U-2 construction postings
and make a posting devoted to just the re-scribing work. While I am no
expert on doing this process (remember, this is my first), I feel I can help
some people out there with writing about my re-scribing endeavors.
I am not going to get into any philosophical discussion of the merits of
raised scribing verses engraved scribing in this posting. All modelers have
their preferences on this topic. Most all prefer engraved scribing
(including myself). Both styles of scribing can look just fine on a
completed model. It is a question that modelers have to answer for
themselves regarding taking this plunge and re-scribing a model.
I can tell you that there is a MASSIVE amount of time-consuming
work required to fully engrave a kit that is raised scribing to start with.
Add to that a large volume of swearing and cursing, as the scribing tools
will invariably slip in the wrong directions in the most visible sections of
the model. It is far easier to learn to deal with the raised scribing than
to re-scribe even one model.
Not withstanding, I wanted to give it a go just once...
I used a variety of tools for the job. The picture here shows most all of
them.
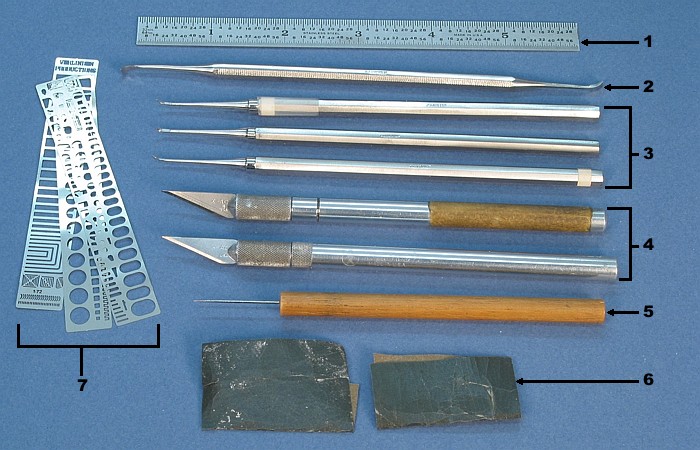
Re-Scribing Tools |
The tools in the picture are as follows.
- Steel Ruler. Shown is a six-inch size. I also used a sixteen-inch
steel ruler when scribing the wings.
- Squadron Scraping Tool. This is marketed as a means to remove
raised panel lines. Its uses are limited and it can gouge the surface of
the plastic if used carelessly, but I did use it on removing most all of
the raised wing panel lines.
- Squadron Scribing Tool. I have a few of these. In spite of them
all being the same exact stock number and packaging, I found that each is
a little different from the others (thinner, fatter, more pointy) and
useful for different things. The tape markings on the handles identify
which tool is which when I go to use them.
- #11 X-acto Knifes. I used these the most out of all the tools
present.
- A Sewing Pin (mounted in a wooden dowel). I actually use this more as
a super glue applicator, but it has uses in re-scribing, too.
- Assorted Grits of Sandpaper. These are the primary means for removing
the raised panel lines and generally leveling the plastic surface after
creating the engraved panel lines.
- Verlinden Scribing Templates. These come in 1/48th
and 1/72nd sizes. I bought these so long
ago that I am unsure which set I own. I think it is the 1/48th
size set.
Some general description is in order, first. There are some things I
needed to watch out for as I worked. No matter which style scribing
technique I was using, it was important to do two things:
- Take time. This is one process I could not rush. Every time I
got a little cocky and started working faster, the tools would slip or I
would put a line in the wrong place. Fixing incorrect or botched engraved
lines is hard to do without destroying the good lines around them.
- Be Gentle. It was easy to try to press the scribing tools hard
to make lines quicker in two heavy passes instead of six light ones. The
problem with pressing hard is that when (not "if") I slipped, the error
was significant. If I kept the pressure lighter, a slip did not make such
a deep gouge and I could fix the slip with less effort.
Like many tasks in modeling, this one has different ways and different
tools depending on exactly what I am looking to do. As they seemed the
easiest to do, I started with the wings.
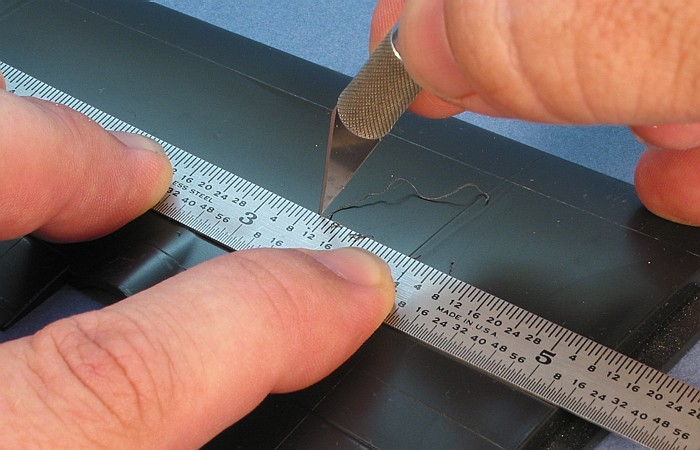
Scribing Lines on Relatively Flat Surfaces
I use only two tools to create the lines for this specific task -- a long
metal ruler and a fresh #11 X-acto blade. I did the scribing prior to
assembling the wings or attaching the tail surfaces as this allowed me to
just lay the parts down flat on my desk and work on them.
I aligned the ruler for the line I wanted, then I drew the blade
backwards along the ruler three or four times. By pulling the blade
backwards, instead of slicing the surface, it gouges a small trough -- an
engraved line. I used only a little pressure on the blade, barely more than
the weight of the knife. As I worked, I was also taking time to relocate any
incorrectly molded kit panel lines.
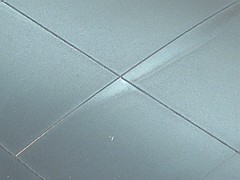
Before Re-Scribing |
During Re-Scribing |
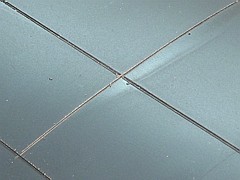
After Re-Scribing |
I used a new blade in the knife for this as this created the finest line.
If I wanted heavier lines, I would use a blade with a part of the tip broken
off. Heavier lines would be needed to mark the edges of control surfaces,
but the kit already had the control surfaces marked with heavy engraved
lines, so I did not need to do anything more for them. Besides, as I using
the Cutting Edge wing update set, I ended up cutting off all the wing
control surfaces and replacing them with resin pieces.
This process could also be done using the Squadron Scribing Tool,
but I found the knife blade provided a better line. While the knife blade
comes to a very fine, sharp point, the scribing tool has a less slender
head. The scribing tool's point is just about as sharp, but the head gets
fatter faster than the knife blade. This makes the lines wider for the
scribing tool than for the knife blade when scribing to the same depth.
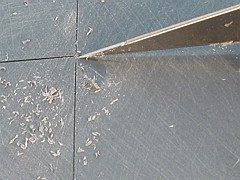
When all the lines were re-scribed on the wing surface, I used the
Squadron Scraping Tool to remove the raised kit panel lines. I had to be
careful with this scraping tool as it was more than capable of gouging the
surface and making me do excess sanding to fix the gouges. Then, I sanded
the entire wing surface with 240-grit sandpaper, followed by 400-grit
sandpaper. Since the model was going to have a flat painted surfaces, not
natural metal, I did not bother with going any lower than 400-grit
sandpaper. The flat paint easily hides sanding marks from 400-grit
sandpaper.
Scraping Away the Raised Lines |
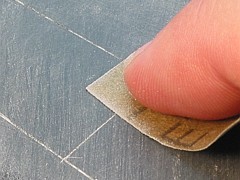
Sanding |
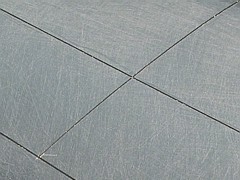
Finished Result |
The sanding process fills all the newly scribed lines with sanding dirt.
After sanding, I again used the knife blade (being pulled backwards), to
clear out the lines. I removed small burrs on the edges of the lines by
leaning the knife blade to one side or the other as I pulled it through the
lines. I had to take care with this process so as not to over-widen the
lines. As it was, they still got wider than I wanted. I figured I would be
OK with them, though. The overall black paint of the U-2 will tend to hide
details unless they are a little exaggerated.
The wings have several small access panels sprinkled over the top and
bottom. I left this go for the moment so they could be done after the wings
were assembled. Scribing these uses a different technique that I will
discuss later in this writing.
Scribing Lines on Rounded Surfaces
Rounded surfaces (like the fuselage and super pods) provided a challenge
in that the metal ruler I was using could not bend enough to go around them.
Thus, I could not use the ruler as a guide. I experimented with the
Verlinden scribing templates as they could bend around the fuselage, but
they were difficult to hold in place and the contoured fuselage with its
gentle tapers complicated getting the template to mark a true line around
the fuselage. I also experimented with using tape to help guide the tools.
No dice with that, either.
I further complicated the process by not re-scribing until after the
fuselage was assembled. I did this on purpose, as I wanted to guarantee that
the lines going around the fuselage would line up. Waiting for the fuselage
to be assembled did this.
The solution in the end was to free-hand the scribing. This was not as
hard as it seems. I still used a ruler to guide my scribing tool on straight
lines run the length of the fuselage. I only did this free hand scribing on
the lines the run around the fuselage.
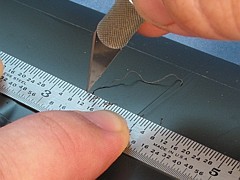
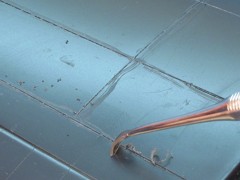
I took an older X-acto blade that had the tip broken off. The
broken point helped to keep the blade running straight and not wobbly. I
pulled the blade forward on the surface, cutting a slice. I followed the
molded panel lines as a guide. After two passes with this blade going
forward, I used a second knife with a fresh blade and pulled it backward
through the slice created by the first blade. The slice helped guide the
fresh blade as it gouged out the line. I was pretty happy with the
workability and results from this process. I only had major slip ups on a
couple occasions.
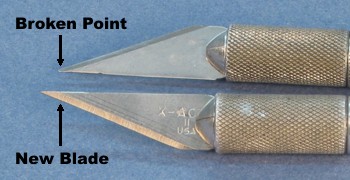
Knife Tips |
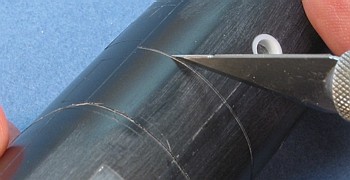
Slicing the Guide Line |
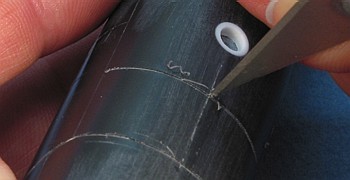
Engraving the Line |
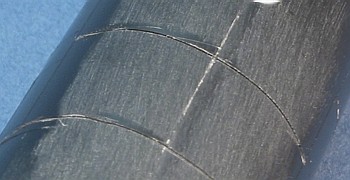
Finished Result |
After the engraved lines were created, I only used sandpaper to remove
the molded kit lines. My experience on doing the wings proved that the
Squadron Scraping Tool would do more harm than good on the rounded
fuselage surfaces. I removed the sanding dirt and burrs from the lines the
same way as on the wings.
Scribing Detail Items and Access Panels
Using the above two processes, I had finished re-scribing the majority of
the model. All that remained were some small access panels and a couple
larger panels that had rounded corners. I needed a different approach to
making lines that were not straight.
Here is where I used the Verlinden scribing template the most. The
Verlinden template is chock full of various shaped cutouts in
assorted sizes. All I needed was a way to scribe the lines that could follow
the rounded lines of most of these panels. While the X-acto blades
work really well on straight lines, they are not good at making curves.
Instead, I used the tool that is normally my super glue applicator -- a
sewing needle imbedded in the end of a wooden dowel.
The tip of the sewing needle is a sharp, rounded cross-section point with
no directional stability. The process of scribing was simple. I located the
template hole that best matched the access panel I wanted to create. I
positioned that template hole in the spot I wanted it. I then traced around
the template hole using the sewing needle point. I kept the needle pretty
much perpendicular to the model surface.
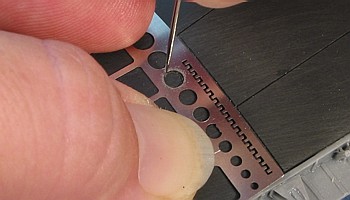
Doing the Lines |
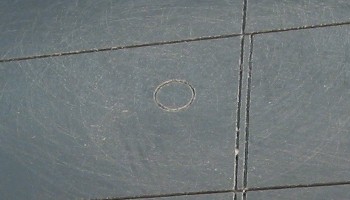
Finished Result |
Using medium pressure and making about five passes all the way around the
template hole, I was able to engrave a deep enough groove into the model
surface to capture the access panel. This process pushed up a raised lip
around the edges of the engraved panel line, so it was necessary to sand the
area after scribing the access panel to remove the raised lips.
Larger panels with rounded corners were done using a combination of
techniques. I would create the straight edges of the panels using one of the
previous methods, stopping short of the rounded corner point. Then, I would
position a scribing template and create the corners of the panel. I needed
to take care that the lines met properly and that the line weight matched,
but the overall process was not that difficult.
A few of the access panels were larger than any of the Verlinden
template holes but not large enough to scribe using the previous methods.
For these, I cut my own templates from 0.010" sheet styrene. I used these
custom-made templates exactly the same way I was using the Verlinden
ones.
All this discussion of how to do the deed sounds good. However, if you
choose this insanity for yourself, be sure to also plan on messing up a few
times. No matter how carefully I held the ruler, once in a while it would
slip. Or, no matter how carefully I drew the scribing tool over the model
surface, once in a while it would stick on some invisible obstacle, and as I
pull a little harder to free it -- WHOOSH! -- it skipped across the model
leaving an unwanted line. Part of making the new engraved lines is knowing
what to do to remove unwanted engraved lines.
Fixing errors has two basic methods -- remove them or fill them. Which
method I used depended on several factors. Minor light lines can be removed
with some sanding or scraping without hurting much else. Deeper lines needed
filling.
Removing Errors
I generally will scrape unwanted light lines using a X-acto blade.
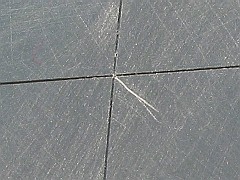
The Error |
Removing the Error |
Finished Result |
If I used this method on deeper lines, there was a more noticeable low
spot where I scraped away the line. A light sanding of the entire area
helped hide this. Besides, many aircraft have slightly uneven points on
there skin. The slight difference in the surface was a welcome "weathering"
point on the surface.
Filling Errors
Filling an error requires patience. Using the tip of a needle, I apply
extremely small amounts of super glue to the error line. I have to keep the
amounts small so as to avoid having the glue run into the good line that is
right next to the error line. For the same reason, I do not accelerate the
super glue. Accelerator can cause the glue to run in all directions in the
split second before it cures. I just apply the glue and leave it alone. In
small quantities, the glue cures rather fast, anyway.
After the glue cures, I sand/cut/scrape the glue to level it out. It
generally took a coating of paint to be sure I filled the line completely.
Well, there you have it. These are the procedures I used to re-scribe my
first totally re-scribed model.
As I said at the beginning, it is a time consuming process that really
can not be rushed. But, if you insist on having engraved panel lines, for
many subjects, this is your only choice. I can tell you that, barring some
unforeseen fit of insanity, this is my first and last totally
re-scribed model.
I'm sure there are plenty of techniques and methods beyond what I have
shown here. I can only say that this worked for me. Your results may differ.
|
 Home |
What's New |
Features |
Gallery |
Reviews |
Reference |
Forum |
Search
Home |
What's New |
Features |
Gallery |
Reviews |
Reference |
Forum |
Search