|
Eu-II's 1/72 scale
Type A Midget Submarine
Kit Instructions
Translation by Allan McRae
|
 |
|
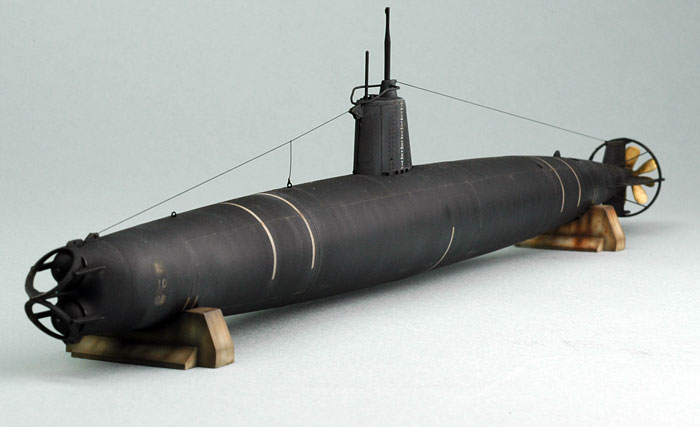
Type A Midget Submarine
(model by Chris Wauchop) |

HyperScale is proudly supported by Squadron
Kit
Background and Instructions |
Below is a translation of
the kit instructions from Eu-II's 1/72 scale Type A Midget Submarine.
The Japanese text was translated by Alland McRae, and forwarded to
HyperScale by Tony Rigby.
1/72 Imperial Japanese Navy
Special Submersible
Kouhyouteki A-Type Used in
the Pearl Harbour Attack
Kit No. EM 72-02
First Special Attack Unit Order
of Battle
|
Mother Submarine |
Crew Names |
|
I-22 |
Commander: Captain
Second-in-Command:
Master Sergeant |
|
I-16 |
Commander: Lieutenant
Junior Grade
Second-in-Command:
Sergeant First Class |
|
I-18 |
Commander: Lieutenant
Junior Grade
Second-in-Command:
Master Sergeant |
|
I-20 |
Commander: Ensign
Second-in-Command:
Sergeant First Class |
|
I-24 |
Commander: Ensign
Second-in-Command:
Sergeant First Class |
The Development of the Kouhyouteki
The planning for a midget
submersible, which later came to be called the Kouhyouteki, commenced in
1932. There are many theories about the origin of the concept, but
according to Mr Shizuo Fukui,”The so-called special submersible
commenced with research by the Imperial Fleet Main Torpedo Department,
which got the idea from the suicide torpedo concept put forward by a
Colonel in the reserves.” That is to say, the idea was to use battery
torpedo technology to approach enemy ships underwater and at high speed
to carry out a surprise attack using torpedos. So development commenced
not so much on a submersible, but rather on a large torpedo which would
carry a crew. It was one desperate measure used by the Japanese Navy,
which at that time faced heavy restrictions on the possession of capital
ships under the terms of a disarmament treaty.
So, in this way, the development
of a midget submersible to be treated not as a warship but as a weapon
went forward at the Kure Arsenal Torpedo Experimental Department, with
two experimental vessels being produced in 1934. The first test vessels
were torpedo-shaped with no coning tower and had the amazing speed, for
a submersible, of 24 knots. It was quickly decided to put them into use.
Two improved vessels were produced in 1938 and the name was standardized
as Kouhyouteki to take the place of previous names used for security
reasons, such as A-Teki, Anti-submarine bombing-Teki and TB Membrane-Teki.
Mass production commenced in 1940 and, along with this, modifications
were made to the seaplane carrier Chiyoda to enable it to carry 12
Kouhyoutekis. It was originally intended that this vessel would be used
to carry them.
Next possible crew members and
mechanics were assembled and training began under top security. There
was movement in the Kouhyouteki towards the outbreak of hostilities
between Japan and the US.
In decisive naval battles, the
Kouhyouteki Units would be launched from the Chiyoda and other carriers
before their main force comrades opened fire, then close in to and come
to grips with the enemy.
Then they would gradually reduce
the fighting strength of the enemy by means of surprise torpedo attacks
and afterwards swing the battle to their favour. This was the blueprint
drawn up by the Imperial Japanese Navy for warship battles between Japan
and the US.
Structure and Performance
The first Kouhyouteki that
entered mass production was called the Kou (A) Model. The first
specifications were 23.9 meters in length and a displacement, when fully
submerged, of 46 tonnes. A secondary battery powered the 600 horsepower
main motor, giving it a maximum underwater speed of 19 knots. Because
the A Model did not have a self-charging diesel generator, it could not
move at all after the power had been used up. Its underwater cruising
range at full power was 16 nautical miles and 80 nautical miles at a
much reduced speed of 6 knots. It was planned that only the crew would
enter the Kouhyouteki after the warships had concluded their attacks
(I’m not sure what this means; maybe that prior to entering the sub
everything else was already in place-Allan). The two-man crew,
consisting of a Captain and his second-in-command, were housed under the
coning tower. Its fitted weapon was two Type 98, 45 centimetre,
oxygen-powered “muzzle-loaded” torpedos with a range of 3,200 meters.
The noses of the torpedos protruded (from their housing-Allan) at first,
but at the time of the Hawaii operations they were fitted with a sealed
cap.
The Kouhyouteki, which could be
called the crystallization of Japanese submarine and torpedo technology,
considered to be far in advance of the other major world powers, was,
again quoting Mr Shizuo Fukui, “In a manner of speaking, the vessel
itself was a precision instrument.”, although it is true that, as a
weapon, there were many problems requiring a solution because its
structure was less that what was hoped for. Underwater trim maintenance
was difficult, so control wasn’t crisp at all. In addition, structural
problems caused the vessel to rear upwards and surface as far back as
the coning tower when the torpedos were fired. The latter defect could
not be avoided. Also, the crew faced many safely problems due hydrogen
gas being generated from the secondary battery. Nevertheless, those
chosen as possible crew members were selected with priority placed on
their superb skill and wonderful of fighting spirit, underwent gruelling
training, made this new weapon their own and waited for the opening of
hostilities between Japan and the US.
The Pearl Harbour Special Attack Unit
The Kouhyouteki was thrown into
operations at the very start of hostilities, commencing with the Pearl
Harbour attack on 8 December 1941. Its mission in this attack, so
different to its original function, was to secretly enter Pearl Harbour
and deliver a surprise attack on the ships there. However, this was an
idea put forward by the crew and their strong hopes resulted in great
part to its implementation. Although Admiral Isoroku Yamamoto, the
supreme commander, said,”If it we can’t put a crew in it, it won’t be
implemented” because at first the likelihood was small that it could
take a crew, it gained approval because efforts were made to redevelop
the Kouhyouteki into (a vessel-Allan) which could secretly enter
harbours and ports and full consideration was given to its accommodating
a crew.
In order to be operational, the
underwater cruising range of the Kouhyouteki was lengthened from 4 to 16
hours by increasing the gas reservoir for steering power instead of
reducing part of the battery, and by fitting attachments at the bow,
conning tower and near the screws to break anti-submarine nets. For
secrecy, the redeveloped Kouhyouteki was called a special storage tube,
stored on the rear deck of five submarines refigured to hold storage
tubes and covered with canvas. Then they set out for Hawaii.
They were designated the First
Special Attack Unit and were given the mission of secretly entering the
harbour prior to the commencement of hostilities, lying in wait and then
commencing their attack at the same time as the air units. About five
hours prior to the attack of the air units, a Kouhyouteki under the
command of (Lieutenant Junior Grade) Yokoyama was launched on the 7th at
12:42 am (local time) about 10 nautical miles from the mouth of Pearl
Harbour and all the other vessels were launched afterwards at intervals
of thirty minutes. Then, at 3:42 am, the minesweeper, Condor, cruising
near the mouth of the harbour, spotted something like a periscope and
contacted the destroyer Ward, which was patrolling in the area.
Although the periscope soon
disappeared, the Ward continued searching and at 6:37 am spotted a
periscope trying to secretly enter the harbour tailing behind the
Antilles, a warship on special duty. It attacked it furiously with mines
and sunk it. This was the first shots fired in the Pacific War and the
special storage tubes were the first vessels lost. Reports are that the
Ward sunk another unidentified vessel soon afterwards at 7:30 near the
mouth of the harbour. Then, shortly after 8 am, the air units commenced
their attack and the whole harbour descended into confusion. Much is
unclear about the activities of the special storage tubes in Pearl
Harbour, but US records indicate that at this point at least two special
storage tubes succeeded in secretly entering the harbour and it is
confirmed that torpedoes were fired. There is, however, no confirmation
about what happened to them. Amongst all this, the Kouhyouteki under the
command of Ensign Sakamaki, which was launched last and with a faulty
gyrocompass, in the end didn’t make it to the mouth of the harbour and
ran aground onto a reef. Sakamaki was forced to escape, was washed
ashore on the beach of Oahu Island and became the war’s first prisoner.
In the end, none of the vessels
of the First Attack Unit returned home. With the exception of Ensign
Sakamaki, all 9 crew members perished. It quickly became known to the
unit that Ensign Sakamaki was a prisoner and that the special storage
tubes had fallen into US hands. In order to honour their bravery and
with the aim of concealing that the Ensign and the Kouhyouteki had been
captured by US forces, it was trumpeted to the Japanese people that the
nine crew members were to be made war heroes.
They were given a naval funeral,
promoted two ranks and even were made the subject of a military song.
The navy deemed the Kouhyouteki’s attacks a great success and formed a
Second Special Attach Unit.
Subsequent War Record
The targets for the Second
Special Attack Unit were the Allies’ base in the South Pacific--Sydney
Harbour in Australia-- and the port of Diego Suarez, which was located
on the east coast of Madagascar and was the British Navy’s base in the
Indian Ocean.
There was a simultaneous attack
on these two bases on 31 May 1942. Three vessels attacked Sydney,
sinking the accommodation ship (actually converted ferry-Allan),
Kuttabul, but none of them returned home. On the other hand, the two
vessels that secretly entered the port of Diego Suarez sunk the oil
supply ship British Royalty and seriously damaged the military vessel,
Ramirez. While this was a good military accomplishment, neither of these
two vessels, too, were able to return home.
So, none of the Kouhyouteki
which carried out these two harbour attacks returned home. But some say
that this is because not only were there still many deficiencies with
the vessels as a weapon, but also that it was too much to expect the
Kouhyouteki, which was originally developed for hit and run use during
warship warfare, to be used as a vessel having the endurance to secretly
enter, at low speed, heavily guarded harbours and ports. Moreover, while
some say that the crew of the Kouhyouteki carried out their attack
resigned to not returning, it is a fact that the submarine (from which
it was launched-Allan) continued to wait for its return at the
rendezvous point and, disregarding its own safety, surfaced and then
searched (for the Kouhyouteki-Allan) along the coast. It worked hard to
retrieve the Kouhyouteki. Even so, much can be said and written about
the bravery and technological skill of the crew, which undertook the
difficult mission of secretly entering a harbour in a very imperfect
weapon and with little hope of survival.
Utilizing the Kouhyouteki for
attack on harbour and ports being viewed with pessimism, it was then
used for local defence and attacks on coastal anchorages where movement
could be relatively freer. In July 1942, six vessels set out for the
Island of Kiosk in the Aleutians to help with its defence and this was
followed in November of the same year when they were thrown into
offensive and defensive operations around Guadalcanal. In particular,
the Third Special Attack Unit carried out eight attacks on a fleet of
American transport ships at their anchorage in Lunge in Guadalcanal.
Five crews of the eight participating vessels survived, sinking at least
two transport ships and inflicting very heavy damage of two more. So, in
this way, finally the Kouhyouteki was able to demonstrate its ability,
was further developed into the C-type with increased range due to its
ability to recharge (its own batteries-Allan) and was thrown into battle
all over the Pacific, which was increasing in intensity.
Painting and Markings
Hawaii: Attack on Pearl Harbour
December 1941
Signal light: white
Decal No 8 on both sides
Hull overall: 33 flat black
Vessel No. 34: Kiska Island and
Narumi (?-Allan) Island
August 1943
Signal light: white
Decals Nos. 8 and 9 on both
sides
Vessel No. 36: Kure and Ourasaki
Bases
August 1944
Decal No. 7 common to all three
vessels
Signal light: white
Decals Nos. 8, 11, 12 and 13 on
both sides
Small decal No. 1: on same place
on Vessels No. 34
Stand Placement
Position the stand on decals
nos. 4 and 5
Colour 32 Warship color; dark
glay (sic)
On the painting of the
Kouhyouteki
Prior to the outbreak of
hostilities, the Kouhyouteki was painted in a warship colour, but
following the commencement of the war it seems that this was changed to
an overall colour flat black.
Although it appears that in
general the vessels' serial numbers were painted on the side of the
conning tower and the hull, this cannot be confirmed in the case of
those that participated in the attack on Pearl Harbour.
In addition, small parts of the
vessel, including the torpedo heads, periscope, screws and so one were
also painted black because of the nature of their function.
This kit gives you decals to
replicate the markings of three kinds of Kouhyouteki, the one that
attacked Pearl Harbour and Models 34 and 36. Please decide which one you
want to make because starting your model. In the case of Models 34 and
36, there are some parts that you don’t need to use and some that need
to be modified simply. Please follow the instructions.
Hull assembly
Prepare hull parts 1 and 2,
apply glue lightly here and there and cement together. Once they are in
position, the application of liquid cement should produce a clean join.
The hinge faces forward (on the
coning tower-Allan)
If you are making Models 34 and
36, the protruding part No. 10 should be cut this way.
Nose cap: the groove goes
uppermost.
The nose guard was fitted Pearl
Harbour, but in the case of the Sydney and Madagascar attacks, which
occurred afterwards, a differently-shaped guard was used to allow the
vessel to ride over such obstacles. In the case of coastal protection at
Kiosk and other islands nothing was fitted.
Periscope attachment
Part 12 does not need to be used
in the case of Models 34 and 36.
First, attach part No. 8, insert
part No. 12 as in the diagram and then attach part No. 9 last.
Special Submersible and Kaiten
units called their periscopes “special glasses” because security
required that their use be concealed.
Nose Guard Attachment
Do not attach these guards in
the case of Models 34 and 36.
First, attach all parts No. 16
completely to part No. 14, thread it onto part No. 13 and attach it to
the nose. Lastly, attach part No. 17.
Screw Attachment
Do not use Part No. 20 in the
case of Models 34 and 36.
Attach the screw guard first.
There are two grooves and 4 indentations on the screw guard. With the
indentations facing forward (towards the coning tower-Allan) and with
the grooves on top and bottom, attach this part to the rudder.
Reference: The rudder and screw
guard were supported by stays. Because the molding process makes it
difficult to reproduce these stays, only the bases of the stays have
been molded. A convincing model can be made by reproducing the stays
with stretched sprue. The lengths of each stay can be found in the
diagram below, but it probably would be best to make them a little
longer and then trim them to the correct length.
Stay Diagram
Do not use stays Nos. 3 and 4 in
the case of Models 34 and 36.
Stay number one 21 mill by 2
Stay number two 20 mill by 2
Stay number three 14 mill by 2
Stay number four 13 mill by 1
Stay number one, left and right
Stay number two, left and right
Stay number three, left and
right
Stay number four, one underneath
Attaching small parts
Reference: A jumping cable was
stretched from the nose of the Kouhyouteki to the coning tower and then
to the tail to enable it to ride over anti-submarine nets. A convincing
model can perhaps be made by using something like fishing line to
replicate the cable. The location of the cable and the way it was
attached can be found in this diagram and in the side views on Page 4.
Reference: The jumping cable
that was stretched from the bow in the direction of the coning tower was
threaded through a roller on top and in the front of the coning tower
and then was secured by a hook on the hull just in front of the coning
tower. The hook can be replicated by twisting a thin length of wire as
per the diagram.
The stands, parts Nos. 24 and
25, should not be attached. The two stands are different, so refer to
Page 4 for their correct location.
Reference: The jumping cable on
Models 34 and 36 was attached differently. The location of the cable and
the way it was attached can be found in this diagram and in the side
views on Page 4.
Translation by Allan McRae
Page Created 01 December, 2005
Last Updated
01 December, 2005
Back to Reference Library
|
 Home |
What's New |
Features |
Gallery |
Reviews |
Reference |
Forum |
Search
Home |
What's New |
Features |
Gallery |
Reviews |
Reference |
Forum |
Search