|
Building
Vacform Models
Part
One - The Basics
by Brett T. Green
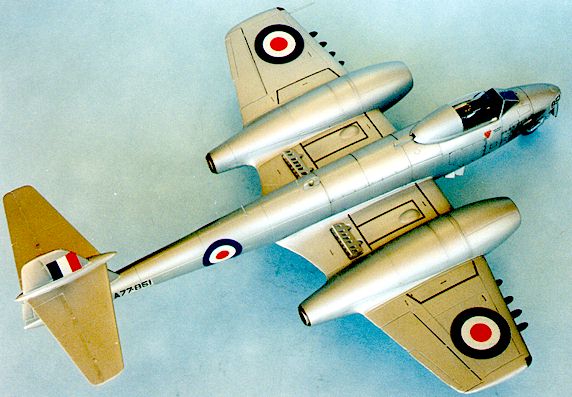 |
Meteor
F.8
Aeroclub Vacform 1/48 Kit |
See also
"Gloster
Meteor F.8", a Construction Feature on HyperScale, for a detailed
description of a vacform modelling project.
Why
Build a Vacform Model?
Modellers
today are presented with a breathtaking choice of kits. Most major aircraft,
armour and car subjects are already available in injection moulded form. Very
little effort is required to build a great looking model.
However, the peculiar nature of many modellers is that we often want to build a
very specific subject. Sometimes we want to build something because it is not
available in mass-produced form. Others may simply wish to rise to a new
challenge.
Technological
advances have not been limited to the injection-moulded model industry. Vacform
models have made stupendous leaps in quality and detail in the last ten years.
Vacformed parts now feature surface detail to rival the major manufacturers.
Many vacform kits are now multi-media masterpieces with brass etched parts,
white metal and resin adorning the basic plastic.
And
if you want to build a Barracuda, a Firefly, a Hudson or a Caribou in 1/48
scale; or a Boomerang in 1/32 scale; there is only one game in town – vacform!
What
is Vacform?
Vacuum
Forming (vacform) is an inexpensive method of producing basic shapes on sheet
plastic.
A
master pattern is first built by a pattern maker. A female mould is then created
from the master, Finally, heat and suction is applied to flat sheet plastic to
produce a raised impression of this female mould. The limitations of this method
mean that it is not possible to replicate undercuts and some complex shapes.
The
modeller is left with the task of cutting the parts off the sheet and cleaning
them up for assembly.
The
big benefit of vacforming is that big tooling costs are avoided, making it
practical to produce a short run of esoteric subject matter that would not
otherwise be available.
What
Vacform Model Should I Start On?
I
recommend a conversion for a first attempt at vacform modelling.
Falcon
produce a number of “Triple Conversion Sets” including Spitfires, Bf 109s
and a number of Century Series jets. Sierra Scale Models also produce a very
high quality Wirraway conversion.
These
conversions contain a small number of parts (usually two fuselage halves, a
canopy and some details) making them an ideal introduction to this media.
The Falcon and Sierra conversions are still in production.
If
you really want to tackle a full kit, then select your first model from the list
of “High Tech / High Quality” manufacturers below.
Hi
Tech/High Quality?
The
finished product from any of the following manufacturers will match the standard
of many injection-moulded kits. These companies usually supply smaller detail
parts in injection-moulded plastic, resin or white metal. The modeller is not
required to fabricate many (or any) detail parts. Instructions and decals are
typically included.
The
following list of manufacturers is not comprehensive, but is a starting point:
|
Dynavector
|
|
PP
Aeroparts
|
|
Sierra
Scale Models
|
|
Aeroclub
|
|
Falcon
(later releases)
|
|
Karo
As
|
|
MPM
|
|
Koster
|
|
Aircraft
in Miniature (1/72 Scale Civil Subjects)
|
|
FM
(Australian company – 1/32 scale Boomerang)
|
|
OzMods
(Australian company - 1/48 scale Caribou)
|
"DIY"
Kits
There
is another category of kits that should not be attempted by the beginner.
They
are typified by companies like ID Models. The modeller is presented with nothing
but a few sheets of vacform plastic. Features such as landing gear and cockpits
must often be built from scratch. Surface detail may be soft, or missing
altogether. And decals? What are they!
Although
these kits are not for the feint hearted, they do fill a niche for modellers who
have very specific interests. Despite their very basic nature, they are better
than nothing. However, the modeller should have experience of vacform modelling
and scratchbuilding before commencing this style of project.
| Building
a Vacform Kit - The Basics |
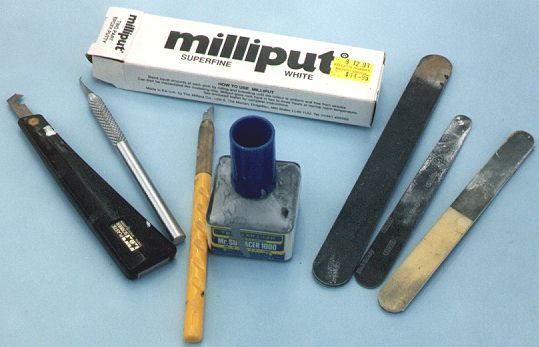
The
Tools
As
with any modelling project, an appropriate set of tools is essential.
The
biggest difference between vacform modelling and building a conventional
injection-moulded kit is the preparation of the parts. Specific tools required
for parts preparation are available inexpensively from the local Supermarket or
Hobby Shop.
Here
is my suggested checklist of tools for dealing with vacform parts:
|
Tool
|
Purpose
|
|
Hobby
Knife with Several New Blades
|
General
cutting and cleanup.
|
|
Hobby
Knife with Several New Blades
|
General
cutting and cleanup.
|
|
Scriber
|
My
preference is an Olfa P-Cutter (also available as a Tamiya Scriber).
This tool is an alternative to a knife for removing large vacform parts
from the sheet. It may also be used to restore or improve surface detail
on plastic parts.
|
|
30cm
Steel Rule
|
Essential
for measuring and cutting straight edges.
|
|
Pencil
or Black Marker
|
For
marking edges and part descriptions
|
|
Scissors
|
A
sharp, strong pair of scissors. Handy for cutting excess from plastic
sheets
|
|
Side
Cutters
|
For
“nibbling” around small vacform parts before final cleanup.
|
|
Pin
Vice
|
With
drill bits for drilling locating holes.
|
|
Emery
Boards
|
Disposable
nail files. I find these cheap files indispensable.
|
|
Nail
Buffing Stick
|
For
final polish.
|
|
Glasspaper
|
Various
grades of paper from around 400 grit to 2000 grit
|
|
Sanding
Block
|
Either
a small block of wood, or a reusable sanding block such as the Sandvik
“Handy Sander”.
|
|
Liquid
Glue
|
For
a strong bond between vacform parts with no locating pins.
|
|
Super
Glue
|
To
bond small metal or resin detail parts (super glue should not be used
for parts under load).
|
|
Epoxy
Glue
|
To
secure multi-media parts under load (eg undercarriage)
|
|
Tape
|
I
use various widths of Tamiya masking tape for many tasks including test
fitting and securing parts while glue dries.
|
|
Two-Part
Epoxy Putty
|
My
preference is Milliput White. The grain is very fine, it stays workable
for at least 30 minutes and it is easy to shape on the model. Doesn’t
smell either.
|
|
Surface
Putty
|
Mr
Surfacer or similar will ensure a smooth, blemish-free finish.
|
|
Putty
Trowels
|
Nothing
fancy – I use a staple remover (my favourite), old knife blades and
ice-cream sticks.
|
|
Tweezers,
Pliers and Clamps
|
For
handling and holding small items.
|
Getting
Started
It
is important to follow recommended assembly
sequence and instructions in this style of kit. If instructions are supplied,
read them! Familiarise yourself with the instructions and identify all the parts
before you start.
Preparing
the Parts
I
follow a set sequence when preparing vacform parts:
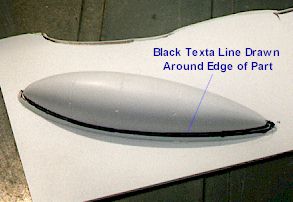
- 1.
Draw Around Parts – Take your marker or pencil and
draw around the outline of all the parts, making sure that you get
into the edge where the part meets the sheet. Don’t worry if the
line is thick.
|
|
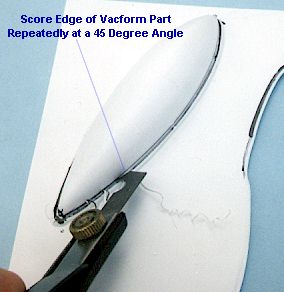
2.
Scribe Around Parts – Now take the scriber and
score, lightly at first, all around the parts. Hold the scriber at 45°
angle to the part (see picture). Don’t leave a border – scribe right
up against the part. Repeat the scoring until the scriber has nearly cut
through.
|
|
3.
Remove Parts From Sheet – Use your scissors to
cut a section of the backing sheet around the part away from the main
sheet. Next cut some “channels” into the backing sheet toward the
part. You’ll need more “channels” on curved parts. Now simply snap
off the backing sheet from the part.
|
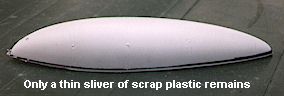
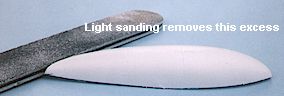
4.
Clean Up The Part – You will be left with a part that
has a black line around its edge (that you marked earlier), and a thin
wedge of plastic below the line. The black line indicates the limit of
sanding. Don’t sand above this line! Use a sanding block or a large,
coarse nail file to sand off the excess and check your work regularly.
Keep the sanding block wet while working – it’ll make it easier to
clean up later.
|
| 5.
Thin Trailing Edges – Generally, trailing edges will
need more attention even after the excess plastic has been removed by
sanding. I find that sanding trailing edges is tedious and inefficient.
Try using the back of a hobby knife blade to scrape the inside surfaces
of trailing edges to achieve scale thickness. |
Getting
Ready to Assemble
Vacform
parts don’t have any locating pins so extra care must be taken to ensure
correct alignment.
Tape
major assemblies together to find any problem areas, then work out a plan to
deal with them.
It
is sometimes helpful to add small rectangles of scrap plastic sheet as locating
tabs for parts with a fairly straight, flat join (eg fuselage halves and engine
nacelles)
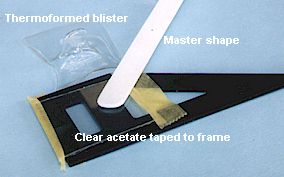
Thermoforming
Thermoforming
allows small parts to be custom-made. No special equipment is required. This
method is useful for creating replacement canopies of small, simple shapes.
Follow these steps:
|

|
1.
Master - A simple master can be made from plastic,
balsa or metal.
2.
Frame - A frame should be made up with a hole big
enough for the part.
3.
Preparing for Thermoforming - A sheet of white styrene
or clear acetate should be secured to the frame. I usually tape the
plastic to the outside edges of the frame. Use fairly thick plastic as
this method stretches (and therefore thins) the produced part.
4.
Taking the Plunge – Hold plastic in the frame over a
candle until the plastic softens. Don’t hold it too close and make
sure you have a bucket of water in case the plastic catches fire! When
the plastic is soft, plunge the master into the plastic and through the
frame. Immediately remove the plastic from the heat source. You may even
wish to dunk the part in water at this point.
5.
Do It Again – This is a trial and error method. You
probably fouled up the first time! Try again until you are happy with
your replacement part. |
Filing
and Sanding
Vacform
modelling usually leaves more gaps and joins than a corresponding injection kit.
My method of filling and sanding a vacform is as follows:
1.
Main Filling – I like Milliput for a number of reasons. As a
two-part epoxy putty it adds structural strength to the model. It isn’t just
sitting between a gap. It is also very pliable and stays that way for a long
time. The grain is extremely fine and it is also easy to sand, wet or dry. The
key to using Milliput is in the mixing. I never mix pieces that are bigger than
half the size of a pea. This allows me to rub the two parts briskly between my
palms until it is a thin snake of putty, then roll it up into a ball and repeat
several times. The warmth of the friction improves the pliability too. Apply the
thoroughly mixed putty to gaps, and shape with a wet finger or a putty trowel.
2.
Sanding – When the Milliput is dry, start lightly sanding
with 600 grit paper. Don’t go too heavy – vac-form material is softer than
injection moulded plastic and it scars easily. Use progressively finer grades
until a smooth finish is achieved
3.
Finishing – The main disadvantage of using Milliput on
vacforms is that the putty is white and the plastic is also usually white. This
makes it difficult to ensure that all the tiny gaps are filled. I therefore
brush on a coat of “Mr Surfacer 1000”, followed by a light sanding. This
helps achieve a perfect finish.
Building
a vacform model can be rewarding because it introduces new skills and can open
doors to a range of otherwise unavailable subjects.
Don’t be afraid to stretch yourself and test
some of these new techniques – you never know where it might lead!
Images, Text and Model Copyright © 1999 by Brett Green
Page created on 25 August, 1999
This page last updated on
12 May, 2002
Back to The Reference Library
Back to HyperScale Home Page
|
 Home |
What's New |
Features |
Gallery |
Reviews |
Reference |
Forum |
Search
Home |
What's New |
Features |
Gallery |
Reviews |
Reference |
Forum |
Search