|
Weathering
Model Aircraft
by David W.
Aungst
|
|
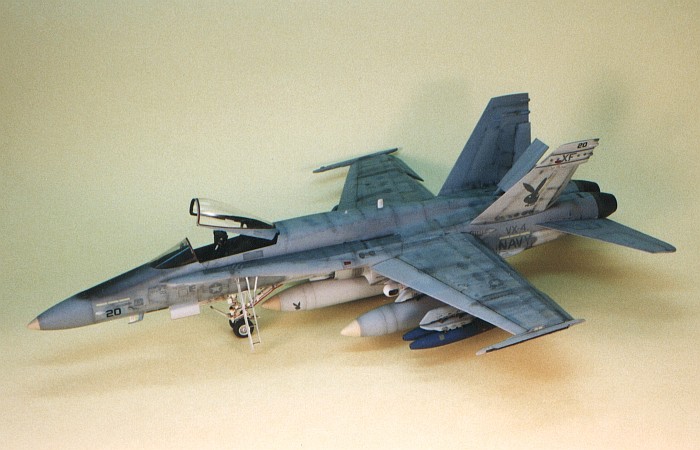
F/A-18 Hornet |
There are portions of model building that are very mechanical -- "insert
peg A into hole B and add glue". Other portions of model
building are more of a routine -- "put paint in an air brush jar, thin it
to proper consistency, and paint the model". Following the completion of
all the mechanical and routine steps, you have a sterile representation of what
the subject would look like if you placed it into a dark vacuum chamber and
never exposed it to any elements.
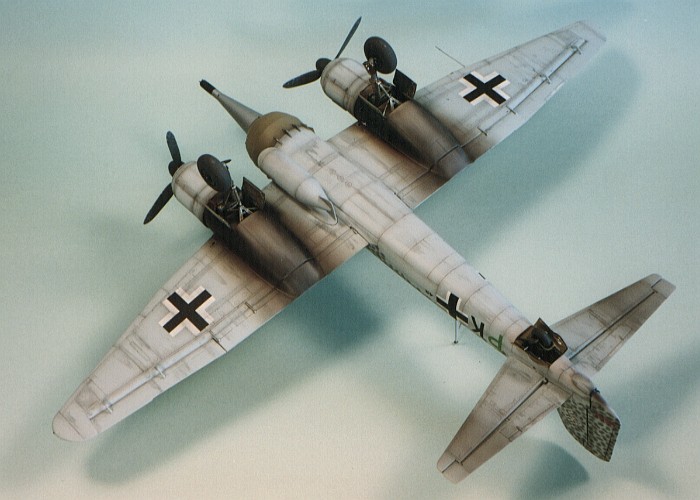
Weathering is a term associated to the process of making the model
look like it has been used. This usage takes many forms: dirt and grime
accumulations, exhaust staining, sun fading of the paint, rusted metal, and lots
more. Weathering is really more artistic than mechanical or routine. I have
learned and refined much of what I do today from a guy in my model club that
works in graphic arts. It is this artist that built some of the best weathering
examples I have ever seen.
While I fortunately have been blessed with some artistic ability, not
everyone is. That does not mean that people with less artistic ability can not
weather models. It just means they need to work with some simple techniques to
start developing their artistic abilities. There is no "silver bullet"
when it comes to weathering. More than any other process in modeling, weathering
is one that requires practice to develop a set of techniques that work for you.

The biggest artistic point in weathering is knowing when to stop -- how much
is too much? The model keeps looking better and better as the weathering is
applied. Suddenly, a magic line is crossed and the weathering is too much,
ruining the whole effect. Knowing where that line is and when to stop is the
real trick to weathering. I have been learning this over the years, sometimes
with catastrophic results.
What follows is a detailed description of how I go about weathering my
models. What I write here is specific to the way I do weathering. I make no
bones about being right or wrong here. Every modeler has there own tricks and
styles. No tricks or styles are wrong as long as the modeler is happy with the
outcome of their labors. While I am always looking to improve my abilities, I am
satisfied with the results I get using the procedures I am going to outline
here.
My motto is simulate, not duplicate. You can duplicate
sun fading by placing your model in the sun for a couple years, but who wants to
take that much time? You can simulate the same effect with some careful
mixing and lightening of the paints. Weathering requires you to simulate the
passage of time, perhaps years, all in the time you spend building the model,
which could be as short as a week or two.
The effects of scale can not be ignored. I am not looking to get into a
discussion of "scale effecting" paint colors, although I do. What I do
want to point out is that a model is substantially smaller than the subject it
represents. What needs to be considered is that modelers are using one-to-one
scale paints and coatings to simulate what those coatings on the real subject
would look like if someone were to shrink the subject down to the appropriate
scale. Such a shrinking would include the paint and dirt and everything, not
just the simple size of the subject.
Take for example the powder burn stains around guns. These are formed by tiny
particles of unburned gunpowder "dusting" the surface around the gun
as well as some actual burning of the paint. Viewed in detail on the real
subject, these are course and grainy. If a modeler were to precisely duplicate
that finish on a 1/48th scale model, it
wouldn't look right as the grains would be way too big. It is important to
remember the scale reduction of the powder grains when applying the stains on a
scale model. The same is true for fluid leaks, shoe scuff marks, paint chipping,
etc.
No single technique will do all weathering. My method involves several
techniques, executed in sequence, to build up the desired finish on the model.
Depending on the exact need, I may skip some steps or re-apply some steps
multiple times to achieve the results I want. With practice, these techniques
are not real difficult or time consuming. I can completely weather an average
size aircraft with general, overall weathering in a couple two-hour sittings.
The reason I can not do it all in a single sitting is because there is need for
drying time during the process.
- First, I build the model. I will fully build the airframe, paint the
camouflage, and apply the decals. I'll leave off the landing gear and little
details, adding these to the model as appropriate either during weathering
or after the weathering is done.
- Following the application of the decals, I gloss coat the entire model for
one final time. Using my airbrush, I give the entire model a good coat of
clear gloss using Floquil Crystal Coat. I dilute the Crystal Coat
50/50 with Xylene as thinner. This is actually a lacquer paint and lacquer
thinner, but I have never had trouble covering Model Master enamels with
them. I thin the Model Master enamels with the same Xylene thinner, which
prepares them for over-coating by this gloss finish. The purpose of this
clear coat is to prepare the surfaces for application of washes using
thinner-based paints. After applying the gloss coat, I let the model dry
overnight so the washes do not eat into the gloss paint.
- I apply thinner-based enamel paint washes. I tend toward the darker colors,
usually black. I generally will also include a medium brown or dark tan wash
in select areas. I apply these by dipping a paint brush in the paint color,
then swishing the brush in a cap full of mineral spirits (thinner) until the
brush is mostly clean. The brush tip, wet with "dirty" thinner, is
then carefully touched to the places where panel lines cross and the corners
of details. Capillary action draws the "dirty" thinner off the
brush and along the panel lines and edges of the details. Controlling the
"dirtiness" of the thinner effects the darkness of the washes.
Repeated applications also make progressively darker highlights.
Invariably, some of the "dirty" thinner gets onto the model
surfaces around the panel lines where I touch the paintbrush. To remove
these excesses, I swipe my finger gently over the spot in the direction of
the airflow on the aircraft. This will create a small streak. Controlling
the locations where I touch the paintbrush to the model controls where these
streaks are created.
Raised or engraved panel lines work the same in this process. There are
inside edges with raised panel lines, similar to the troughs created by
engraved panel lines. On raised lines, I try to only highlight one side of
the panel line, thus avoiding the look where a bright line (the top of the
raised panel line) is surrounded on both sides by dark highlighting.
- Following the washes, I flat coat the model, again using my airbrush. For
clear flat paint, I am hooked on PollyScale (used to be PollyS)
Flat Finish. This paint gives the flattest finish I have found. Here is when
the fruits of my labors start to come alive. With the model now a uniform
flat sheen, all the subtle variations in colors created by the washes start
to become really visible.
- After the flat coat, I turn to my air brush to do shading on the model.
This shading takes two forms. The first form is the simulation of actual
dirt. Many of the streaks created by the washes are rather light in their
centers with darker edges. I use the air brush to lightly fill in the
centers of these streaks. I also will lightly draw lines along the panel
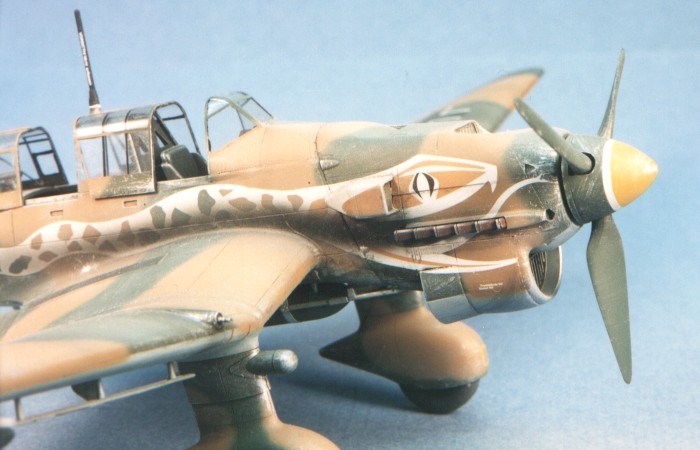
lines of the model. Lastly, this is how I create exhaust stains and powder
burns.
The second form is the simulation of shadows. I
lightly darken the inside corners of the model like wing roots, the base of the
vertical tail, the underside of intakes and antennas, etc. While this seems a
fruitless point (obviously there will already be natural shadows on the model),
this shading helps convince the viewer's mind's eye that the model is sitting
under outdoor daylight rather than the omnipresent lighting of the indoor room
where the model is displayed. Trust me on this one ... ;o)
To control the paint in this shading process, I keep it extremely thin. I
will put one drop of paint in an air brush jar with two or three eye-droppers
full of thinner. This creates a mixture that you can almost see though. Using
this paint mixture, a single pass of the air brush hardly makes any difference.
But, repeated passes will start to build up a dark area. This thin mixture makes
it so that paint splattering is not visible, contributing to a subtler shaded
look.
For color choices, obviously I use black for this shading. But, in some
applications, browns, tans, blues, grays, and greens all have uses. It depends
on the model and the camouflage colors. For engine exhausts, there is almost
always a brown and gray portion to the stain. Accounting for and including these
colors can make dramatic differences in the look of the exhaust stain.
- By now, I have completed over 90% of the weathering. The final
step involves dry brushing the model to show wear and tear. I use dark gray
and black paint to simulate scuff marks from maintenance crew shoes. I use
silver to simulate chipped and worn paint.
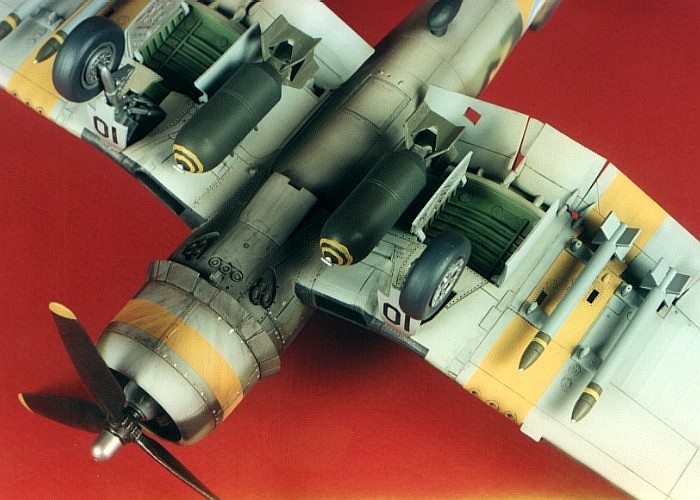
This process, with minor variation, works on most all parts of the model, not
just the outside surfaces. I use this process inside the cockpits, inside the
wheel wells, on the landing gear, and just about everywhere and anywhere that I
need to simulate weathering. The best thing about this weathering process is
that it is permanent. I can (and do periodically) wash my models under running
water without disturbing the weathering that I fought hard to create. Try that
with pastels...
The above process can simulate a wide spectrum of weathering types. By
varying the amount of thinner used, I can darken or lighten the effects. By
varying the colors of paint, I can tailor the look and feel of the weathering.
There are some special cases, though, that require different techniques. The
following items deal directly with each special case.
Off-Color
Paint
Touch-Ups |
This is not that hard, provided the modeler can control
their air brush enough to paint fine spots. I create the touch-ups the
same way they are created on the actual subject, one spot at a time. The
artistic point to this process is not to over-do the spots in either
quantity, size, or color. I carefully study pictures of the real aircraft
to find the common places where paint touch-ups occur. I also make note
what colors are most often used for the touch-ups. Then I mix up the
appropriate colors and start painting.
As the off-color touch-ups were accumulated over time on the real
aircraft, I intersperse the painting of them throughout the whole
weathering process. That way, they are both under and over some of the
weathering layers and better capture the look of the touch-ups.
Note that the gloss and flat coating I use to finish the model do tend to
slightly change the original colors painted in the camouflage. By simply
using the exact same colors in which I already painted the camouflage, I
can achieve very subtle touch-ups that are real eye-catchers for the
people that really get in and scrutinize the models. A lot of times I can
achieve a change in the "feel" of the finish that does not
really even show up without a very careful study of the paint.
|
| Exhaust
Stains |
I touched on this above, but I wanted to further discuss it.
Exhaust stains are both an art and a science. To paint exhaust stains, first I
study pictures to learn the stain pattern for the specific aircraft on which I
am working. Compare the stain patterns on an AD-6 Skyraider to those found on
something like an Fw 190A-8. Note the bends and kinks in the patterns. Every
aircraft has a stain pattern that is unique to it. After investigating the
stain patterns, I mix up the appropriate colors in extremely thin mixtures and
start slowly building up the stains on the model.
Exhaust stains come in various colors based on two factors -- the camouflage
color they are applied to and the content of the fuel the aircraft was
burning. High lead content in the fuel and darker camouflage colors makes for
more gray colors in the exhaust stain. For example, note the gray exhaust
stain colors on black A-26 Invaders in Korea. Now look at the silver A-26s
from the same period. It is the same fuel, but now the exhaust stains are
almost all black. The gray is present on the silver A-26s, but does not show
much on the silver background.
An example of fuel content changing the stain is found on W.W.II German
aircraft. The gray color in the exhaust stains is practically nonexistent.
Germany's fuel had a different lead content than the Allies did, hence the
change in their exhaust stain colors.
|
| Sun
Fading |
This is a tough one. There are no easy ways to create
this. I have tried two different ways to create this effect. The first
involves "dusting" the entire upper surface with an extremely
thin mixture of a light color (I used beige) during the shading step
outlined above. This had the advantage of working on the entire model,
decals and all. The down side was that it sort of looked like dust on
the model, not fading.
A second way I have tried to do this involves mixing multiple shades of
the camouflage colors, at least two or three shades of each color in
graduated darkness levels. I applied the lightest shades to the upper
areas of the model, the medium shades to the sides, and the darkest
shades to the bottom areas. I carefully blended the colors with wide
feathering patterns as I worked my way down the model sides. This looked
much more like actual fading. The down side was that it is much more
labor intensive. It also did nothing to fade the colors in the decals.
|
As I said at the start of this writing, weathering is more of an art form
than a routine task in modeling.
Mastering a few simple techniques can go a long way to improving how your
weathering looks on your models. Once you master the techniques, you can start
to work on the artistic side of the issue. Figure out when enough is enough and
you will have it licked.
Models, Description and Images Copyright ©
2000 by David Aungst
Page Created 29 October, 2000
Last Updated 18 May, 2001
Back to HyperScale Main Page
Back to Reference Index
|
 Home |
What's New |
Features |
Gallery |
Reviews |
Reference |
Forum |
Search
Home |
What's New |
Features |
Gallery |
Reviews |
Reference |
Forum |
Search